Pose for the week

Lord of the Dance Pose

Lord of the Dance Pose

Want to, like, connect with cosmic energy? Nataraja is another name for Shiva and his dance symbolizes cosmic energy. Natarajasana, or Lord of the Dance Pose.

We’ll start with a modified version of the pose. The full pose will be described in the Variation section below.

(not-ah-raj-AHS-anna)

nata = actor, dancer, mime

raja = king

Lord of the Dance Pose: Step-by-Step Instructions

Step 1

Stand in Tadasana (Mountain Pose). Inhale, shift your weight onto your right foot, and lift your left heel toward your left buttock as you bend the knee. Press the head of your right thigh bone back, deep into the hip joint, and pull the knee cap up to keep the standing leg straight and strong.

Step 2

There are two variations you might try here with your arms and hands. In either case, try to keep your torso relatively upright. The first is to reach back with your left hand and grasp the outside of your left foot or ankle. To avoid compression in your lower back, actively lift your pubis toward your navel, and at the same time, press your tailbone toward the floor.

Step 3

Begin to lift your left foot up, away from the floor, and back, away from your torso. Extend the left thigh behind you and parallel to the floor. Stretch your right arm forward, in front of your torso, parallel to the floor.

Step 4

The second option with the hands is to sweep your right hand around behind your back and catch hold of the inner left foot. Then sweep the left hand back and grab the outside of the left foot. This variation will challenge your balance even more. Then raise the thigh as described in step 3. This second variation will increase the lift of your chest and the stretch of your shoulders.

Step 5

Stay in the pose for 20 to 30 seconds. Then release the grasp on the foot, place the left foot back onto the floor, and repeat for the same length of time on the other side.

Full Pose

For the full pose, perform step 1 as described above. Then turn your left arm actively outward (so the palm faces away from the side of the torso), bend the elbow, and grip the outside of the left foot. (You can also grab the big toe with the first two fingers and the thumb.) The fingers will cross the top of the foot, the thumb will press against the sole. Inhale, lift the left leg up, and bring the thigh parallel to the floor. As you do this, rotate the left shoulder in such a way that the bent elbow swings around and up, so that it points toward the ceiling. It requires extreme flexibility to externally rotate and flex the shoulder joint in this way. Reach the right arm straight forward, in front of the torso and parallel to the floor. Hold for 20 to 30 seconds, release, and repeat on the second side for the same length of time.

Pose Information

Sanskrit Name

Natarajasana

Pose Level

1

Modifications and Props

Balance can be difficult in the modified version. Try bracing the free hand against a wall to help you stay stable.

Deepen the Pose

You can move even further into this pose by grasping the raised foot with the off-side hand. Complete the pose as described above in the Full Pose section. Then inhale and swing the free hand first up toward the ceiling, then bend the elbow and reach for the inside of the raised foot.

Preparatory Poses

Follow-up Poses

Natarajasana is usually performed as the final pose of a series of challenging backbends. You’ll probably want to release the spine by coming to Ardha Uttanasana (Half Uttanasana), also known as Right Angle Pose, at the wall or reclining twist.

Beginner’s Tip

Many beginners, when lifting the leg, tend to cramp in the back of the thigh. Be sure to keep the ankle of the raised foot flexed; that is, draw the top of the foot toward the shin.

Benefits

  • Stretches the shoulders and chest
  • Stretches the thighs, groins, and abdomen
  • Strengthens the legs and ankles
  • Improves balance

Pose for the week

Asana for the week

monkey pose

Monkey Pose

Take a leap of faith into Hanumanasana or Monkey Pose, named for a figure in Hindu mythology who did just that. And when faith doesn’t get you all the way there, practice will.

(hah-new-mahn-AHS-anna)

“It was the greatest leap ever taken. The speed of Hanuman’s jump pulled blossoms and flowers into the air after him and they fell like little stars on the waving treetops. The animals on the beach had never seen such a thing; they cheered Hanuman, then the air burned from his passage, and red clouds flamed over the sky . . .” (Ramayana, retold by William Buck).

This pose then, in which the legs are split forward and back, mimics Hanuman’s famous leap from the southern tip of India to the island of Sri Lanka.

Practice this pose on a bare floor (without a sticky mat) with folded blankets under the back knee and front heel.

Monkey Pose: Step-by-Step Instructions

Step 1

Kneel on the floor. Step your right foot forward about a foot in front of your left knee, and rotate your right thigh outwardly. Do this by lifting the inner sole away from the floor and resting the foot on the outer heel.

Step 2

Exhale and lean your torso forward, pressing your fingertips to the floor. Slowly slide your left knee back, straightening the knee and at the same time descending the right thigh toward the floor. Stop straightening the back knee just before you reach the limit of your stretch.

Step 3

Now begin to push the right heel away from your torso. Because we started with a strong external rotation of the front leg, gradually turn the leg inward as it straightens to bring the kneecap toward the ceiling. As the front leg straightens, resume pressing the left knee back, and carefully descend the front of the left thigh and the back of the right leg (and the base of the pelvis) to the floor. Make sure the center of the right knee points directly up toward the ceiling.

Step 4

Also check to see that the back leg extends straight out of the hip (and isn’t angled out to the side), and that the center of the back kneecap is pressing directly on the floor. Keep the front leg active by extending through the heel and lifting the ball of the foot toward the ceiling. Bring the hands into Anjali Mudra (Salutation Seal) or stretch the arms straight up toward the ceiling.

Step 5

Stay in this pose for 30 seconds to a minute. To come out, press your hands to the floor, turn the front leg out slightly, and slowly return the front heel and the back knee to their starting positions. Then reverse the legs and repeat for the same length of time.

Pose for the week

Asanas for the week

Four-Limbed Staff Pose

Learn four-limbed staff pose because it is frequently practiced as part of the traditional Sun Salutation sequence.

(chaht-tour-ANG-ah don-DAHS-anna)
chaturanga = four limbs (chatur = four
anga = limb)
danda = staff (refers to the spine, the central “staff” or support of the body)

Four-Limbed Staff Pose: Step-by-Step Instructions

Step 1

Step 2

With an exhalation slowly lower your torso and legs to a few inches above and parallel to the floor. There’s a tendency in this pose for the lower back to sway toward the floor and the tailbone to poke up toward the ceiling. Throughout your stay in this position, keep the tailbone firmly in place and the legs very active and turned slightly inward. Draw the pubis toward the navel.

Step 3

Keep the space between the shoulder blades broad. Don’t let the elbows splay out to the sides; hold them in by the sides of the torso and push them back toward the heels. Press the bases of the index fingers firmly to the floor. Lift the top of the sternum and your head to look forward.

Step 4

Chaturanga Dandasana is one of the positions in the Sun Salutation sequence. You can also practice this pose individually for anywhere from 10 to 30 seconds. Release with an exhalation. Either lay yourself lightly down onto the floor or push strongly back to Adho Mukha Svanasana, lifting through the top thighs and the tailbone.

Pose Information

Sanskrit Name

Chaturanga Dandasana

Pose Level

1

Contraindications and Cautions

  • Carpal tunnel syndrome
  • Pregnancy

Modifications and Props

You can get a feel for this challenging position by practicing it standing upright. Stand and face a wall, a few inches away from the wall. Press your hands against the wall, slightly lower than the level of your shoulders. Imagine that you are trying to push yourself away from the wall, but the firmness of your shoulder blades against the back prevents any movement. Lengthen your tailbone into your heels and lift the top of your sternum toward the ceiling.

Deepen the Pose

Even experienced students have difficulty with Chaturanga Dandasana. Lay a thickly rolled blanket on the floor below your Plank Pose, parallel to your spine. Lower yourself lightly onto this support. Use it minimally, just enough to keep yourself afloat.


Beginner’s Tip

The completed form of Chaturanga Dandasana is quite difficult to perform at first, until your arms, back, and legs are strong enough to support you. From Plank Pose, begin by lowering your knees to the floor and then, with an exhalation, lower your sternum to within an inch or two above the floor.

Benefits

  • Strengthens the arms and wrists
  • Tones the abdomen

Partnering

A partner can help you learn to anchor the pelvis in this pose and lengthen the spine. Perform Chaturanga Dandasana (using a blanket support under your thighs if needed). Have your partner straddle your waist, pigeon-toe his/her feet, and squeeze the top rim of your pelvis with his/her lower legs. Your partner can drag your pelvis back slightly, toward the feet, while you lift the top of your sternum in the opposite direction.

Variations

If possible, slowly roll over the balls of your feet onto the tops of your feet and shift the torso slightly forward. This will bring the hands back beside your waist and increase the challenge of the position.

Pose for the week

Asana for the week

Bow Pose

Bow Pose

Bend back into the shape of a bow to feel energetically locked, loaded, and ready to take aim.


Dhanurasana (Bow Pose): Step-by-Step Instructions

This pose is so called because it looks like an archer’s bow, the torso and legs representing the body of the bow, and the arms the string.

(don-your-AHS-anna)
dhanu = bow

Step 1

Lie on your belly with your hands alongside your torso, palms up. (You can lie on a folded blanket to pad the front of your torso and legs.) Exhale and bend your knees, bringing your heels as close as you can to your buttocks. Reach back with your hands and take hold of your ankles (but not the tops of the feet). Make sure your knees aren’t wider than the width of your hips, and keep your knees hip width for the duration of the pose.

Step 2

Inhale and strongly lift your heels away from your buttocks and, at the same time, lift your thighs away from the floor. This will have the effect of pulling your upper torso and head off the floor. Burrow the tailbone down toward the floor, and keep your back muscles soft. As you continue lifting the heels and thighs higher, press your shoulder blades firmly against your back to open your heart. Draw the tops of the shoulders away from your ears. Gaze forward.

Step 3

With the belly pressed against the floor, breathing will be difficult. Breathe more into the back of your torso, and be sure not to stop breathing.


Step 4

Stay in this pose anywhere from 20 to 30 seconds. Release as you exhale, and lie quietly for a few breaths. You can repeat the pose once or twice more.


Pose Information

Sanskrit Name

Dhanurasana

Pose Level

1

Pose for the week

Asana for the week

Half Lord of the Fishes Pose

Half Lord of the Fishes Pose

Half Lord of the Fishes Pose/Seated Twist Pose, called Ardha Matsyendrasana in Sanskrit, invites an energy in the spine that helps to stimulate proper digestion while improving postural and body awareness.

Half Lord of the Fishes Pose: Step-by-Step Instructions

Sep 1

Sit on the floor with your legs straight out in front of you, buttocks supported on a folded blanket. Bend your knees, put your feet on the floor, then slide your left foot under your right leg to the outside of your right hip. Lay the outside of the left leg on the floor. Step the right foot over the left leg and stand it on the floor outside your left hip. The right knee will point directly up at the ceiling.

Step 2

Exhale and twist toward the inside of the right thigh. Press the right hand against the floor just behind your right buttock, and set your left upper arm on the outside of your right thigh near the knee. Pull your front torso and inner right thigh snugly together.

Step 3

Press the inner right foot very actively into the floor, release the right groin, and lengthen the front torso. Lean the upper torso back slightly, against the shoulder blades, and continue to lengthen the tailbone into the floor.

Step 4

You can turn your head in one of two directions: Continue the twist of the torso by turning it to the right; or counter the twist of the torso by turning it left and looking over the left shoulder at the right foot.

Step 5

With every inhalation lift a little more through the sternum, pushing the fingers against the floor to help. Twist a little more with every exhalation. Be sure to distribute the twist evenly throughout the entire length of the spine; don’t concentrate it in the lower back. Stay for 30 seconds to 1 minute, then release with an exhalation, return to the starting position, and repeat to the left for the same length of time. Watch a video demonstration of this pose.

Pose Information

Sanskrit Name

Ardha Matsyendrasana

Pose Level

1

Contraindications and Cautions

  • Back or spine injury: Perform this pose only with the supervision of an experienced teacher.
Pose for the week

Asana for the week

Crane (Crow) Pose

A compact arm balance, Crane Pose/Crow Pose, called Bakasana in Sanskrit, encourages toning in the abs and the arms, strengthening in the core, and improves focus in the mind.

(bahk-AHS-anna)
baka = crane

Crane (Crow Pose): Step-by-Step Instructions

Step 1

Squat down from Tadasana with your inner feet a few inches apart. If it isn’t possible to keep your heels on the floor, support them on a thickly folded blanket. Separate your knees wider than your hips and lean the torso forward, between the inner thighs. Stretch your arms forward, then bend your elbows, place your hands on the floor and the backs of the upper arms against the shins.

Step 2

Snuggle your inner thighs against the sides of your torso, and your shins into your armpits, and slide the upper arms down as low onto the shins as possible. Lift up onto the balls of your feet and lean forward even more, taking the weight of your torso onto the backs of the upper arms. In Bakasana you consciously attempt to contract your front torso and round your back completely. To help yourself do this, keep your tailbone as close to your heels as possible.

Step 3

With an exhalation, lean forward even more onto the backs of your upper arms, to the point where the balls of your feet leave the floor. Now your torso and legs are balanced on the backs of your upper arms. As a beginner at this pose, you might want to stop here, perched securely on the bent arms.

Step 4

But if you are ready to go further, squeeze the legs against the arms, press the inner hands firmly to the floor and (with an inhalation) straighten the elbows. Seen from the side the arms are angled slightly forward relative to the floor. The inner knees should be glued to the outer arms, high up near the armpits. Keep the head in a neutral position with your eyes looking at the floor, or lift the head slightly, without compressing the back of the neck, and look forward.

Step 5

Stay in the pose anywhere from 20 seconds to 1 minute. To release, exhale and slowly lower your feet to the floor, back into a squat.

Pose Information

Sanskrit Name

Bakasana

Pose for the week

Pose for the week

Chair Pose

Chair Pose

Chair Pose clearly works the muscles of the arms and legs, but it also stimulates the diaphragm and heart

(OOT-kah-TAHS-anna)
utkata = powerful, fierce

Chair Pose: Step-by-Step Instructions

Step 1

Stand in Tadasana. Inhale and raise your arms perpendicular to the floor. Either keep the arms parallel, palms facing inward, or join the palms.

Step 2

Exhale and bend your knees, trying to take the thighs as nearly parallel to the floor as possible. The knees will project out over the feet, and the torso will lean slightly forward over the thighs until the front torso forms approximately a right angle with the tops of the thighs. Keep the inner thighs parallel to each other and press the heads of the thigh bones down toward the heels.

Step 3

Firm your shoulder blades against the back. Take your tailbone down toward the floor and in toward your pubis to keep the lower back lo

Step 4

Stay for 30 seconds to a minute. To come out of this pose straighten your knees with an inhalation, lifting strongly through the arms. Exhale and release your arms to your sides into Tadasana.


Pose Information

Sanskrit Name

Utkatasana

Pose Level

1

Pose for the week

Asana for the week

Half Lord of the Fishes Pose

Half Lord of the Fishes Pose

Half Lord of the Fishes Pose/Seated Twist Pose, called Ardha Matsyendrasana in Sanskrit, invites an energy in the spine that helps to stimulate proper digestion while improving postural and body awareness.

Half Lord of the Fishes Pose: Step-by-Step Instructions

Step 1

Sit on the floor with your legs straight out in front of you, buttocks supported on a folded blanket. Bend your knees, put your feet on the floor, then slide your left foot under your right leg to the outside of your right hip. Lay the outside of the left leg on the floor. Step the right foot over the left leg and stand it on the floor outside your left hip. The right knee will point directly up at the ceiling.

Step 2

Exhale and twist toward the inside of the right thigh. Press the right hand against the floor just behind your right buttock, and set your left upper arm on the outside of your right thigh near the knee. Pull your front torso and inner right thigh snugly together.

Step 3

Press the inner right foot very actively into the floor, release the right groin, and lengthen the front torso. Lean the upper torso back slightly, against the shoulder blades, and continue to lengthen the tailbone into the floor.

Step 4

You can turn your head in one of two directions: Continue the twist of the torso by turning it to the right; or counter the twist of the torso by turning it left and looking over the left shoulder at the right foot.

Step 5

With every inhalation lift a little more through the sternum, pushing the fingers against the floor to help. Twist a little more with every exhalation. Be sure to distribute the twist evenly throughout the entire length of the spine; don’t concentrate it in the lower back. Stay for 30 seconds to 1 minute, then release with an exhalation, return to the starting position, and repeat to the left for the same length of time. Watch a video demonstration of this pose

Sanskrit Name

Ardha Matsyendrasana

Pose for the week

Asana for the week

extended triangle

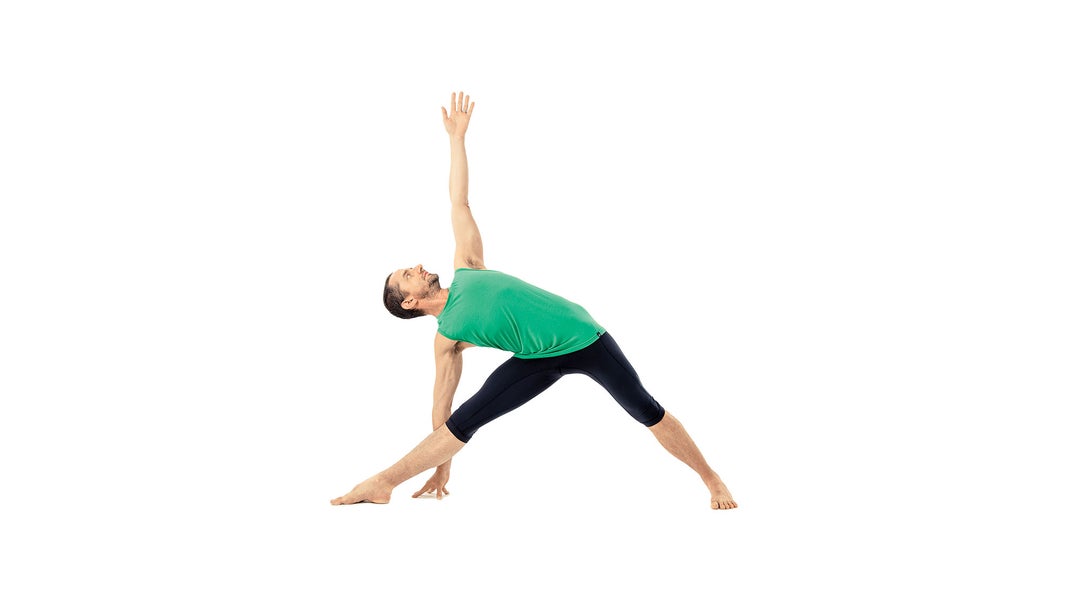
Extended Triangle Pose

Extended Triangle Pose is the quintessential standing pose in many styles of yoga

(oo-TEE-tah trik-cone-AHS-anna) utthita = extended trikona = three angle or triangle

Extended Triangle Pose: Step-by-Step Instructions

Step 1

Stand in Tadasana. With an exhalation, step or lightly jump your feet 3 1/2 to 4 feet apart. Raise your arms parallel to the floor and reach them actively out to the sides, shoulder blades wide, palms down.

Step 2

Turn your left foot in slightly to the right and your right foot out to the right 90 degrees. Align the right heel with the left heel. Firm your thighs and turn your right thigh outward, so that the center of the right knee cap is in line with the center of the right ankle.

Step 3

Exhale and extend your torso to the right directly over the plane of the right leg, bending from the hip joint, not the waist. Anchor this movement by strengthening the left leg and pressing the outer heel firmly to the floor. Rotate the torso to the left, keeping the two sides equally long. Let the left hip come slightly forward and lengthen the tailbone toward the back heel.

Step 4

Rest your right hand on your shin, ankle, or the floor outside your right foot, whatever is possible without distorting the sides of the torso. Stretch your left arm toward the ceiling, in line with the tops of your shoulders. Keep your head in a neutral position or turn it to the left, eyes gazing softly at the left thumb.

Step 5

Stay in this pose for 30 seconds to 1 minute. Inhale to come up, strongly pressing the back heel into the floor and reaching the top arm toward the ceiling. Reverse the feet and repeat for the same length of time to the left.

Pose for the week

Asana for the week

Side-Reclining Leg Lift

Side-Reclining Leg Lift

This side-reclining pose stretches the backs of the legs, the sides of the torso, and tones the belly.

Side-Reclining Leg Lift: Step-by-Step Instructions

Step 1

Lie on the floor on your right. Press actively through your right heel, flex the ankle, and use the outside of the foot to stabilize the position (if you still feel unstable, brace your soles against the wall.

Step 2

Stretch your right arm straight out along the floor parallel to your torso so that you create one long line from the heels to your finger tips. Bend your right elbow and support your head in your palm. Slide the elbow away from your torso to stretch the armpit.

Step 3

Externally rotate your left leg so the toes point toward the ceiling, then bend and draw the knee toward your torso. Reach across the inside of the leg and take hold of the left big toe with your index and middle fingers. Secure the grip by wrapping the thumb around the two fingers. (If you’re not able to comfortably hold the toe, loop a strap around the sole and hold the strap.) On an inhale, extend the leg up toward the ceiling.

Step 4

The raised leg will likely angle slightly forward, while the top buttock will drop back. Firm the sacrum against the pelvis; this creates a kind of fulcrum that will help you move the leg slightly back toward a perpendicular position.

Step 2

Press actively through both heels. Stay in the pose for 30 seconds to 1 minute, then release the leg, take a few breaths, and roll over onto your left side. Repeat for the same length of time.

Pose Information

Sanskrit Name

Anantasana

Pose Level

1


Beginner’s Tip

If you still feel unstable with your soles pressed to a wall, wedge a bolster against your back.

Benefits

Stretches the backs of the legs
Stretches the sides of the torso
Tones the belly

Pose for the week