Pose for the week Yoga Journal

Crane (Crow) Pose

A compact arm balance, Crane Pose/Crow Pose, called Bakasana in Sanskrit, encourages toning in the abs and the arms, strengthening in the core, and improves focus in the mind

(bahk-AHS-anna)
baka = crane

Crane (Crow Pose): Step-by-Step Instructions

Step 1

Squat down from Tadasana with your inner feet a few inches apart. If it isn’t possible to keep your heels on the floor, support them on a thickly folded blanket. Separate your knees wider than your hips and lean the torso forward, between the inner thighs. Stretch your arms forward, then bend your elbows, place your hands on the floor and the backs of the upper arms against the shins.

Step 2

Snuggle your inner thighs against the sides of your torso, and your shins into your armpits, and slide the upper arms down as low onto the shins as possible. Lift up onto the balls of your feet and lean forward even more, taking the weight of your torso onto the backs of the upper arms. In Bakasana you consciously attempt to contract your front torso and round your back completely. To help yourself do this, keep your tailbone as close to your heels as possible.

Step 3

With an exhalation, lean forward even more onto the backs of your upper arms, to the point where the balls of your feet leave the floor. Now your torso and legs are balanced on the backs of your upper arms. As a beginner at this pose, you might want to stop here, perched securely on the bent arms.

Step 4

But if you are ready to go further, squeeze the legs against the arms, press the inner hands firmly to the floor and (with an inhalation) straighten the elbows. Seen from the side the arms are angled slightly forward relative to the floor. The inner knees should be glued to the outer arms, high up near the armpits. Keep the head in a neutral position with your eyes looking at the floor, or lift the head slightly, without compressing the back of the neck, and look forward.

Step 5

Stay in the pose anywhere from 20 seconds to 1 minute. To release, exhale and slowly lower your feet to the floor, back into a squat.

Pose for the week

Pose for the week

King Pigeon

One-Legged King Pigeon Pose

One-Legged King Pigeon Pose is a deep backbend that puffs the chest, making a yogi resemble a pigeon.

The full pose, which is suitable for intermediate students, will be described in the Full Pose section below. First we’ll practice the leg position only, which should be accessible to most experienced beginners. (aa-KAH pah-DAH rah-JAH-cop-poh-TAHS-anna)eka = one pada = foot or leg raja = king kapota = pigeon or dove

One-Legged King Pigeon Pose: Step-by-Step Instructions

Step 1

Begin on all fours, with your knees directly below your hips, and your hands slightly ahead of your shoulders. Slide your right knee forward to the back of your right wrist; at the same time angle your right shin under your torso and bring your right foot to the front of your left knee. The outside of your right shin will now rest on the floor. Slowly slide your left leg back, straightening the knee and descending the front of the thigh to the floor. Lower the outside of your right buttock to the floor. Position the right heel just in front of the left hip.

Step 2

The right knee can angle slightly to the right, outside the line of the hip. Look back at your left leg. It should extend straight out of the hip (and not be angled off to the left), and rotated slightly inwardly, so its midline presses against the floor. Exhale and lay your torso down on the inner right thigh for a few breaths. Stretch your arms forward.

Step 3

Then slide your hands back toward the front shin and push your fingertips firmly to the floor. Lift your torso away from the thigh. Lengthen the lower back by pressing your tailbone down and forward; at the same time, and lift your pubis toward the navel. Roll your left hip point toward the right heel, and lengthen the left front groin.

Step 4

If you can maintain the upright position of your pelvis without the support of your hands on the floor, bring your hands to the top rim of your pelvis. Push heavily down. Against this pressure, lift the lower rim of your rib cage. The back ribs should lift a little faster than the front. Without shortening the back of your neck, drop your head back. To lift your chest, push the top of your sternum (at the manubrium) straight up toward the ceiling.

Step 5

Stay in this position for a minute. Then, with your hands back on the floor, carefully slide the left knee forward, then exhale and lift up and back into Adho Mukha Svanasana (Downward Facing Dog Pose). Take a few breaths, drop the knees to all-fours on another exhalation, and repeat with the legs reversed for the same length of time.

Pose for the week

Pose for the week Yoga Journal

Half Lord of the Fishes Pose

Half Lord of the Fishes Pose

Half Lord of the Fishes Pose/Seated Twist Pose, called Ardha Matsyendrasana in Sanskrit, invites an energy in the spine that helps to stimulate proper digestion while improving postural and body awareness.

Step 1

Sit on the floor with your legs straight out in front of you, buttocks supported on a folded blanket. Bend your knees, put your feet on the floor, then slide your left foot under your right leg to the outside of your right hip. Lay the outside of the left leg on the floor. Step the right foot over the left leg and stand it on the floor outside your left hip. The right knee will point directly up at the ceiling.


Step 2

Exhale and twist toward the inside of the right thigh. Press the right hand against the floor just behind your right buttock, and set your left upper arm on the outside of your right thigh near the knee. Pull your front torso and inner right thigh snugly together.


Step 3

Press the inner right foot very actively into the floor, release the right groin, and lengthen the front torso. Lean the upper torso back slightly, against the shoulder blades, and continue to lengthen the tailbone into the floor.

Step 4

You can turn your head in one of two directions: Continue the twist of the torso by turning it to the right; or counter the twist of the torso by turning it left and looking over the left shoulder at the right foot.


Step 5

With every inhalation lift a little more through the sternum, pushing the fingers against the floor to help. Twist a little more with every exhalation. Be sure to distribute the twist evenly throughout the entire length of the spine; don’t concentrate it in the lower back. Stay for 30 seconds to 1 minute, then release with an exhalation, return to the starting position, and repeat to the left for the same length of time. Watch a video demonstration of this pose.

Pose Information

Sanskrit Name

Ardha Matsyendrasana

Pose Level

1

Contraindications and Cautions

  • Back or spine injury: Perform this pose only with the supervision of an experienced teacher.

Modifications and Props

It’s often difficult at first to get the torso snug against the inner thigh. Position yourself a foot or so away from a wall, with your back to the wall; the exact distance will depend on the length of your arms. Exhale into the twist and reach back for the wall. Your arm should be almost but not quite extended (make sure you aren’t sitting too close to the wall, which will jam the shoulder). Push the wall away and move the front torso against the thigh.


Deepen the Pose

If you have the flexibility in the hips and spine you can bring the upper left arm to the outside of the upper right thigh. With the legs in place, exhale and turn to the right. Lean slightly back, away from the upper thigh, and bend the left elbow, pressing it against the outside of the upper right thigh. Then snuggle the torso in against the thigh and work the left upper arm further on to the outer leg until the back of the shoulder presses against the knee. Keep the elbow bent and the hand raised towards the ceiling. Lean into a slight upper-back backbend, firming the shoulder blades against the back, and lift the front torso through the top sternum.


Beginner’s Tip

In this version of the pose, the opposite-side arm is wrapped around the outside of the raised-leg upper thigh. This may be impractical, and potentially harmful, for beginning students. Be sure to sit up well on a blanket support and for the time being just wrap your arm around the raised leg and hug the thigh to your torso.

Benefits

  • Stimulates the liver and kidneys
  • Stretches the shoulders, hips, and neck
  • Energizes the spine
  • Stimulates the digestive fire in the belly
  • Relieves menstrual discomfort, fatigue, sciatica, and backache
  • Therapeutic for asthma and infertility
  • Traditional texts say that Ardha Matsyendrasana increases appetite, destroys most deadly diseases, and awakens kundalini.


Pose for the week

Pose for the week Yoga Journal

Locust Pose

Salabhasana or Locust Pose effectively preps beginners for deeper backbends, strengthening the back of the torso, legs, and arms.

Grouped among the so-called “baby backbends,” which includes Dhanurasana (Bow Pose) and Sea Monster Pose (described in the Variations section below), it is an unassuming pose that, like other seemingly simple poses, is actually a lot more interesting and challenging than it appears at first glance.

(sha-la-BAHS-anna)
salabha = grasshopper, locust

Locust Pose: Step-by-Step Instructions

Step 1

For this pose you might want to pad the floor below your pelvis and ribs with a folded blanket. Lie on your belly with your arms along the sides of your torso, palms up, forehead resting on the floor. Turn your big toes toward each other to inwardly rotate your thighs, and firm your buttocks so your coccyx presses toward your pubis.

Step 2

Exhale and lift your head, upper torso, arms, and legs away from the floor. YouÂ’ll be resting on your lower ribs, belly, and front pelvis. Firm your buttocks and reach strongly through your legs, first through the heels to lengthen the back legs, then through the bases of the big toes. Keep the big toes turned toward each other.

Step 3

Raise your arms parallel to the floor and stretch back actively through your fingertips. Imagine thereÂ’s a weight pressing down on the backs of the upper arms, and push up toward the ceiling against this resistance. Press your scapulas firmly into your back.

Step 4

Gaze forward or slightly upward, being careful not to jut your chin forward and crunch the back of your neck. Keep the base of the skull lifted and the back of the neck long.

Step 5

Stay for 30 seconds to 1 minute, then release with an exhalation. Take a few breaths and repeat 1 or 2 times more if you like.

Pose for the week

Pose for the week

Balancing Yoga Poses

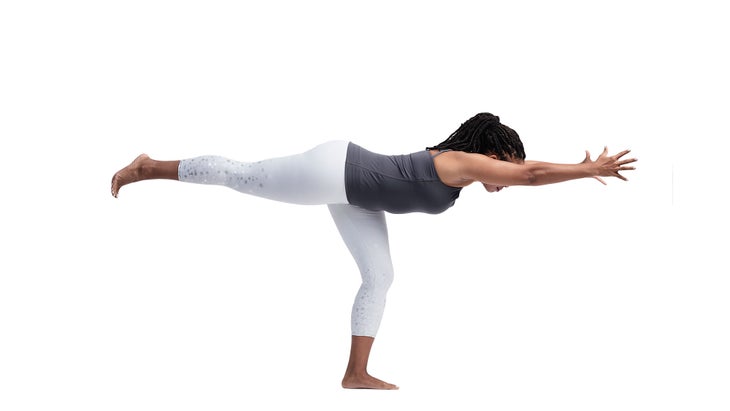
Warrior III Pose

Step-by-step instructions on moving from High Lunge to Warrior III.

Warrior iii pose
Paul Miller

(veer-ah-bah-DRAHS-anna)

Virabhadra = the name of a fierce warrior, an incarnation of Shiva, described as having a thousand heads, a thousand eyes, and a thousand feet; wielding a thousand clubs; and wearing a tiger’s skin.

Warrior III Pose: Step-by-Step Instructions

Step 1

Stand in Tadasana (Mountain Pose), exhale and fold foward to Uttanasana. From Uttanasana, exhale and step your left foot back into a high lunge position. Your right knee should be more or less at a right angle. Lay the midline of your torso (from the pubis to the sternum) down on the midline of the right thigh (from the knee to the hip crease) and bring your hands to your right knee, right hand to the outer knee, left hand to the inner. Squeeze the knee with your hands, lift your torso slightly, and with an exhalation, turn it slightly to the right.

Step 2

Now from the lunge position, stretch your arms forward, parallel to the floor and parallel to each other, palms facing each other. Exhale and press the head of the right thighbone back and press the heel actively into the floor. Synchronize the straightening of the front leg and the lifting of the back leg. As you lift the back leg, resist by pressing the tailbone into the pelvis.

Step 3

Normally students come up into Virabhadrasana III by lunging the torso forward. This tends to shift the body weight onto the ball of the front foot and unbalance the position. Don’t allow the torso to swing forward as you move into position; instead, as you straighten the front knee, think of pressing the head of the thighbone back. This centers the femur in the hip joint, grounds the heel into the floor, and stabilizes the position.

Step 4

The arms, torso, and raised leg should be positioned relatively parallel to the floor. For many students the pelvis tends to tilt. Release the hip [of the raised leg] toward the floor until the two hip points are even and parallel to the floor. Energize the back leg and extend it strongly toward the wall behind you; reach just as actively in the opposite direction with the arms. Bring the head up slightly and look forward, but be sure not to compress the back of your neck.

Step 5

Stay in this position for 30 seconds to a minute. Release back to the lunge on an exhalation. Bring your hands to the floor on either side of the right foot, and on an exhalation, step your left foot forward to meet your right. Stay in this forward bend for a few breaths, then repeat for the same length of time on the other side.

Pose for the week

Pose/Asana for the week

Inversion Yoga Poses

Dolphin Pose

Dolphin pose strengthens the core, arms, and legs, while also nicely opening the shoulders

Dolphin Pose

Dolphin Pose: Step-by-Step Instructions

Step 1

Come onto the floor on your hands and knees. Set your knees directly below your hips and your forearms on the floor with your shoulders directly above your wrists. Firmly press your palms together and your forearms into the floor.

Step 2

Curl your toes under, then exhale and lift your knees away from the floor. At first keep the knees slightly bent and the heels lifted away from the floor. Lengthen your tailbone away from the back of your pelvis and press it lightly toward the pubis. Against this resistance, lift the sitting bones toward the ceiling, and from your inner ankles draw the inner legs up into the groins.

Step 3

Continue to press the forearms actively into the floor. Firm your shoulder blades against your back, then widen them away from the spine and draw them toward the tailbone. Hold your head between the upper arms; don’t let it hang or press heavily against the floor.

Step 4

You can straighten your knees if you like, but if your upper back rounds it’s best to keep them bent. Continue to lengthen your tailbone away from the pelvis and lift the top of your sternum away from the floor.

Step 5

Stay between 30 seconds to one minute. Then release your knees to the floor with an exhale.

Pose for the week

Pose for the week

Gate Pose

Gate Pose

Extend some love to your often neglected side body in Parighasana or Gate Pose.

(par-ee-GOSS-anna)
parigha = an iron bar or beam used for locking or shutting a gate

The pose described immediately below is a simplified variation of the full pose. Then we describe the full pose afterward.

Gate Pose: Step-by-Step Instructions

Step 1

Kneel on the floor. Stretch your right leg out to the right and press the foot to the floor, or use a block for extra support if you can’t reach. Keep your left knee directly below your left hip (so the thigh is perpendicular to the floor), and align your right heel with the left knee. Turn your pelvis slightly to the right (so the left hip point comes forward of the right), but turn your upper torso back to the left. Point the kneecap toward the ceiling, which will require you to turn your right leg out.

Step 2

As you inhale, bring your arms out to your sides, parallel to the floor, palms down. Bend to the right over the plane of the right leg and lay your right hand down on the shin, ankle, or the floor outside the right leg. Contract the right side of the torso and stretch the left. Place your left hand on the outer left hip and push the pelvis down toward the floor. Then slip the hand up to the lower left ribs and lift them toward the shoulder, creating space in the left waist.

Step 3

With an inhalation, sweep the left arm over the back of the left ear. The side bend tends to drop the torso toward the floor. Without pushing the left hip back (continue to roll it slightly forward), turn the upper torso away from the floor.

Step 4

Stay in this pose anywhere from 30 seconds to a minute. Come up as you inhale, reaching through the top arm to draw the torso upright. Bring the right knee back beside the left, and repeat with the legs reversed.

Full Pose
Full Parighasana is a deep side bend. From the starting position described in Step 2 above, lean to the side over the straight leg. Lower the underside of the torso as close as possible to the top of the straight leg. Press the back of the lower hand on the top of the foot, then sweep the top arm over the back of the ear and join the palms. Finish as described in Step 4 above.

Pose for the week

Pose for the week from Yoga Journal

extended triangle

Extended Triangle Pose

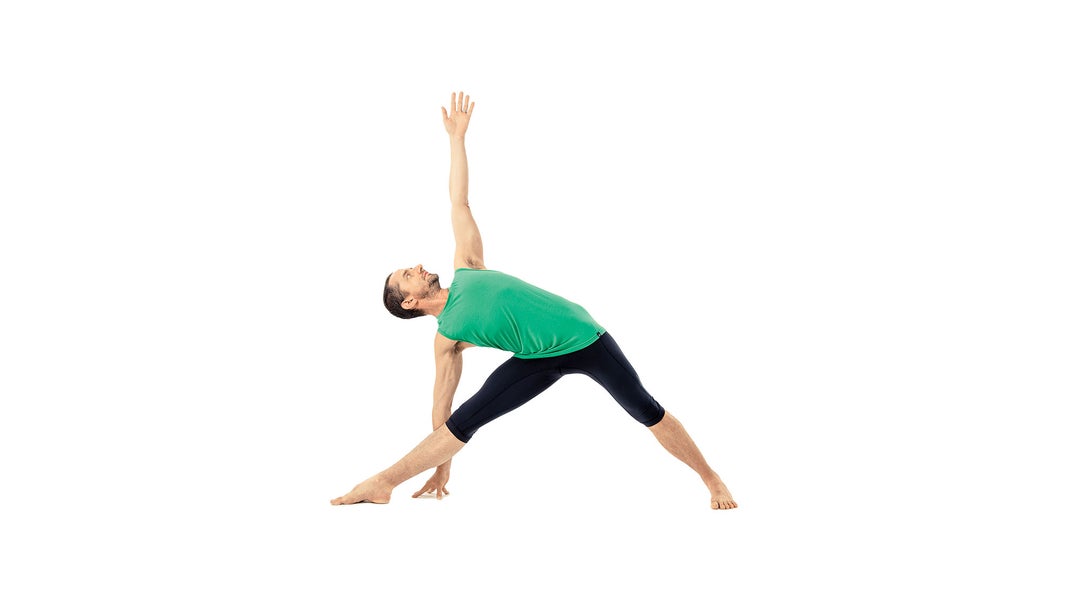
Extended Triangle Pose is the quintessential standing pose in many styles of yoga.

(oo-TEE-tah trik-cone-AHS-anna) utthita = extended trikona = three angle or triangle

Extended Triangle Pose: Step-by-Step Instructions

Step 1

Stand in Tadasana. With an exhalation, step or lightly jump your feet 3 1/2 to 4 feet apart. Raise your arms parallel to the floor and reach them actively out to the sides, shoulder blades wide, palms down.

Step 2

Turn your left foot in slightly to the right and your right foot out to the right 90 degrees. Align the right heel with the left heel. Firm your thighs and turn your right thigh outward, so that the center of the right knee cap is in line with the center of the right

Step 3

Exhale and extend your torso to the right directly over the plane of the right leg, bending from the hip joint, not the waist. Anchor this movement by strengthening the left leg and pressing the outer heel firmly to the floor. Rotate the torso to the left, keeping the two sides equally long. Let the left hip come slightly forward and lengthen the tailbone toward the back heel.

Step 4

Rest your right hand on your shin, ankle, or the floor outside your right foot, whatever is possible without distorting the sides of the torso. Stretch your left arm toward the ceiling, in line with the tops of your shoulders. Keep your head in a neutral position or turn it to the left, eyes gazing softly at the left thumb.

Step 5

Stay in this pose for 30 seconds to 1 minute. Inhale to come up, strongly pressing the back heel into the floor and reaching the top arm toward the ceiling. Reverse the feet and repeat for the same length of time to the left.

Pose Information

Sanskrit Name

Utthita Trikonasana

Pose Level

1

Contraindications and Cautions

  • Diarrhea
  • Headache
  • Low blood pressure
  • Heart Condition: Practice against a wall. Keep the top arm on the hip.
  • High blood pressure: Turn the head to gaze downward in the final pose.
  • Neck problems: Don’t turn your head to look upward; continue looking straight ahead and keep both sides of the neck evenly long.

Modifications and Props

If it isn’t possible to comfortably touch the floor with the bottom hand or fingertips, support the palm on a block.

Pose for the week

Pose for the week

Half Frog Pose

Ease up into Half Frog Pose, called Ardha Bhekasana in Sanskrit. This pose strengthens the back while gently opening up the shoulders, chest, and thighs—a loving treat for the entire body.

How to Say Ardha Bhekasana in Sanskrit

Ardha Bhekasana

Half Frog Pose: Step-by-Step Instructions

Photo: Photo: Christopher Dougherty; Mat: Jade Yoga; Props: Hugger Mugger
  1. Begin kneeling with the thighs perpendicular to the floor, and the knees a little narrower than hips distance
  2. Separate the feet slightly wider than the hips, with the tops of the feet flat on the floor
  3. Extend the big toes straight back and firm the outer ankles into the midline
  4. Inhale, lengthen the spine; exhale, lower the hips partway to the heels with the torso leaning slightly forward
  5. Take the thumbs behind the knees and drag the skin and flesh of the calf muscles toward the heels
  6. Lower the sitting bones between the heels and sit upright
  7. Spin the inner thighs towards the floor and descend the roots of the thighs
  8. Make sure the big toes continue to reach straight back and that the outer ankles haven’t bowed out
  9. Align the crown of the head directly above the pelvis
  10. Draw the heads of the upper arms back in line with the side body while softening the front ribs
  11. Rest the hands in the lap or palms down upon the thighs
  12. Hold for 5 breaths to 5 minutes
  13. To exit come on to All-fours and then take Adho Mukha Svanasana to stretch out the backs on the knees
Pose for the week

Pose for the week

Cow Face Pose

Cow Face Pose

Can’t see the cow face? Notice that the crossed legs look like the lips. The bent-elbow arms, one up and one down, are the ears.

go = cow (Sanskrit go is a distant relative of the English word “cow”)
mukha = face

Cow Face Pose: Step-by-Step Instructions

Step 1

Sit in Dandasana (Staff Pose), then bend your knees and put your feet on the floor. Slide your left foot under the right knee to the outside of the right hip. Then cross your right leg over the left, stacking the right knee on top of the left, and bring the right foot to the outside of the left hip. Try to bring the heels equidistant from the hips: with the right leg on top you’ll have to tug the right heel in closer to the left hip. Sit evenly on the sitting bones.


Step 2

Inhale and stretch your right arm straight out to the right, parallel to the floor. Rotate your arm inwardly; the thumb will turn first toward the floor, then point toward the wall behind you, with the palm facing the ceiling. This movement will roll your right shoulder slightly up and forward, and round your upper back. With a full exhalation, sweep the arm behind your torso and tuck the forearm in the hollow of your lower back, parallel to your waist, with the right elbow against the right side of your torso. Roll the shoulder back and down, then work the forearm up your back until it is parallel to your spine. The back of your hand will be between your shoulder blades. See that your right elbow doesn’t slip away from the right side of your torso.

Step 3

Now inhale and stretch your left arm straight forward, pointing toward the opposite wall, parallel to the floor. Turn the palm up and, with another inhalation, stretch the arm straight up toward the ceiling, palm turned back. Lift actively through your left arm, then with an exhalation, bend the elbow and reach down for the right hand. If possible, hook the right and left fingers.

Step 4

Lift the left elbow toward the ceiling and, from the back armpit, descend the right elbow toward the floor. Firm your shoulder blades against your back ribs and lift your chest. Try to keep the left arm right beside the left side of your head.

Step 5

Stay in this pose about 1 minute. Release the arms, uncross the legs, and repeat with the arms and legs reversed for the same length of time. Remember that whichever leg is on top, the same-side arm is lower.

Pose Information

Sanskrit Name

Gomukhasana

Pose Level

1

Contraindications and Cautions

  • Serious neck or shoulder problems

Modifications and Props

Gomukhasana is a notoriously difficult pose for tight-shouldered people, who aren’t able to hook their fingers together. The simple solution to this dilemma is to hold a strap between the hands. Begin the pose with a strap draped over the shoulder of the bottom arm. In step 2, as you swing the bottom arm behind your back, slide the forearm as high on the back torso as possible (Remember to keep the elbow close to your side), then grab the bottom end of the strap. In step 3, stretch the other arm overhead and then reach down the back for the other end of the strap. Pull with the top arm. See if you can draw the bottom arm higher onto the back. You’re trying to work the hands toward each other and eventually clasp them. Be aware too that you may be able to clasp the hands on one side, but not the other.

Deepen the Pose

You can increase the stretch in this pose if you’re a little more flexible in the shoulders and armpits by moving your hands away from the back of your torso.


Beginners often have a difficult time getting both sitting bones to rest evenly on the floor, which can make it difficult for the knees to stack on top of each other evenly. When the pelvis is tilted, the spine can’t properly extend. Use a folded blanket or bolster to lift the sitting bones off the floor and support them evenly.

Benefits

  • Stretches the ankles, hips and thighs, shoulders, armpits and triceps, and chest.
Pose for the week