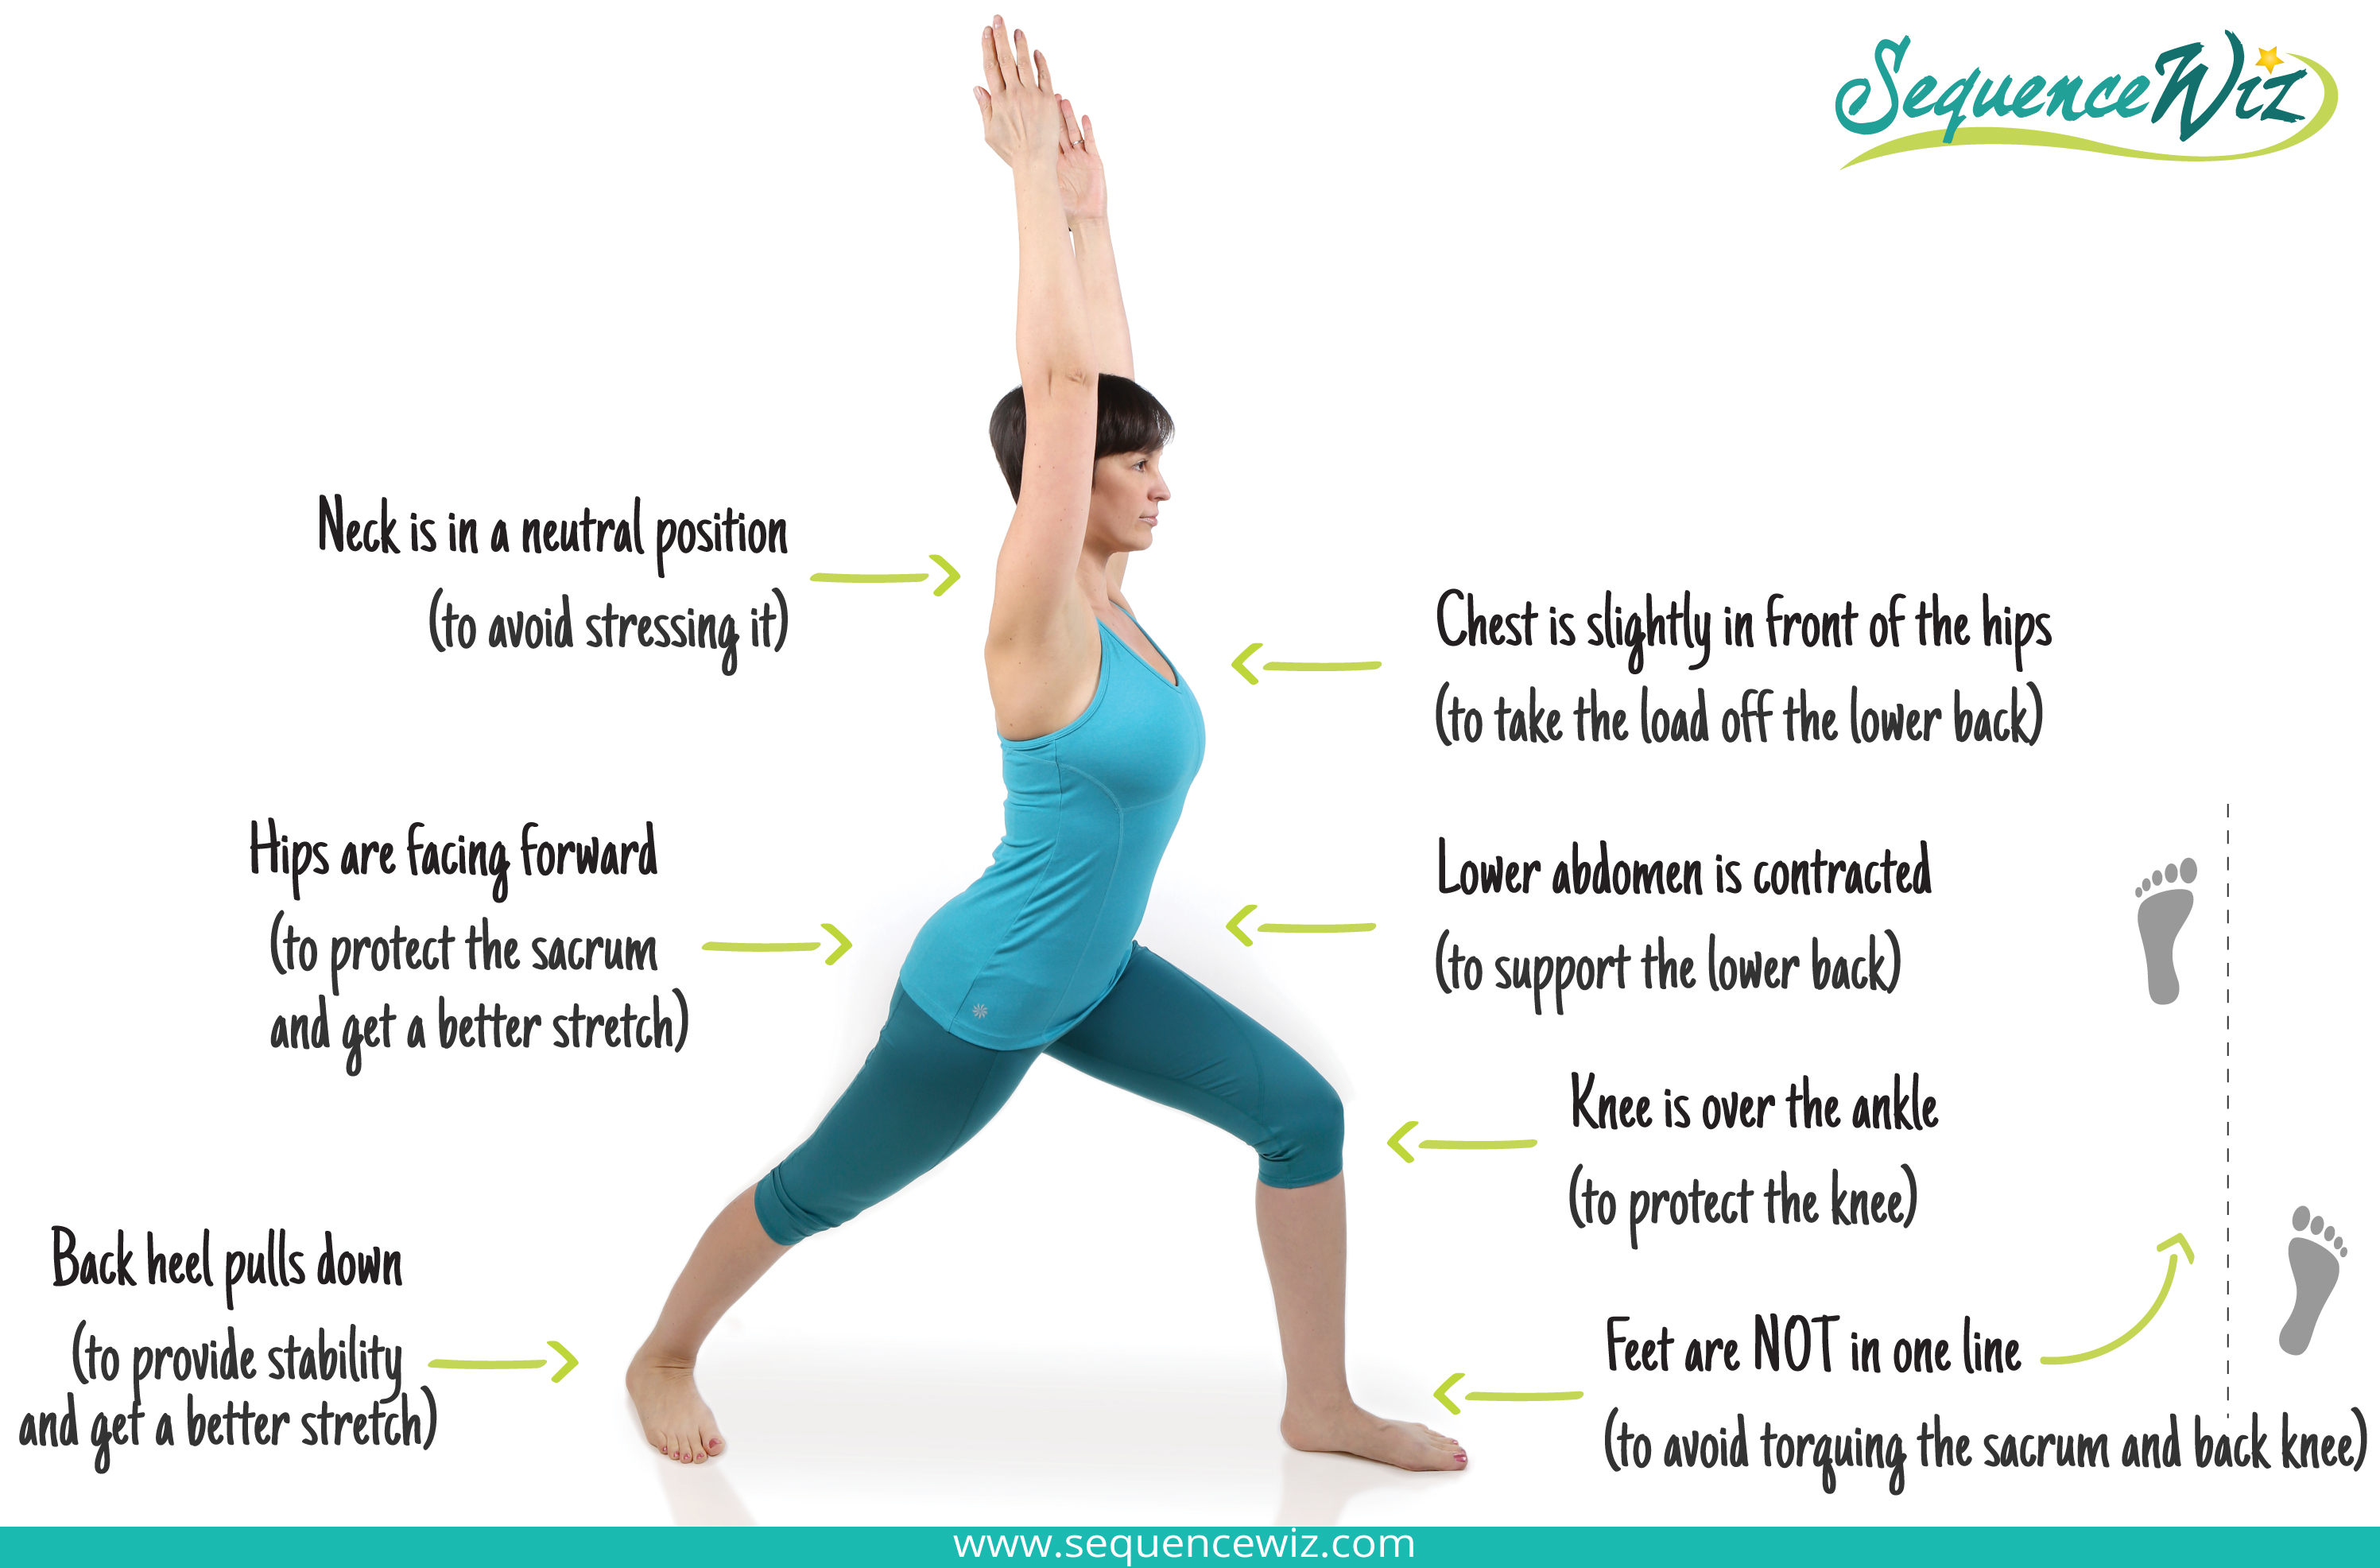
Pose for the week- Warrior I
22
Nov
2021

For exclusive access to all our stories, including sequences, teacher tips, video classes, and more, join Outside+ today and save 20%!.
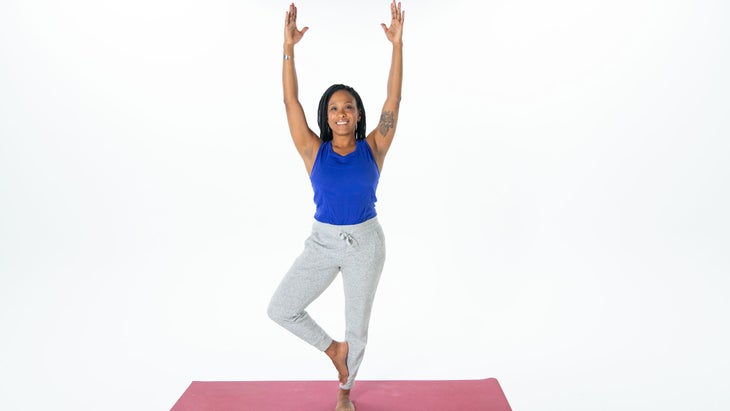
Vrksasana (Tree Pose) teaches you to simultaneously ground down through your body while reaching tall like the branches of a mighty oak tree. In this pose, you balance on one leg while placing the sole of your opposite foot somewhere along the inside of your standing leg (anywhere but your knee!). Continuously engage your ankles, legs, and core and notice what tiny movements your body might make to help you stay balanced.
By strengthening your legs, glutes, core, and back, Tree Pose can help improve your posture and alignment, which is especially helpful if you sit a lot throughout the day.
What makes this seemingly simple pose special is that it teaches you to explore your connection with your body. Maybe one day your lifted foot is positioned closer to your groin. Maybe another day, you leave your foot partially on the ground for balance. Be honest with your limits and learn to honor what your body needs on any given day.
Sanskrit: Vrksasana (vrik-SHAHS-anna)
Targets:Â Lower body
Why we love it: “A tidbit I picked up along the way and have often repeated is that stiffer trees are more likely to be felled in a storm; the trees that can bend in the wind are less prone to breaking. I love to remember this in Vrksasana: a little sway from side to side is a sign of resilience and an opportunity to find equilibrium in the middle of shifting circumstance.†—Sage Rountree, Yoga Journal contributor
This standing posture is a great pose for improving your balance, as well as your postural and body awareness. In addition to its physical benefits, this pose can assist in calming and relaxing the mind—relieving you of anxious thoughts and feelings.
These cues will help protect your students from injury and help them have the best experience of the pose:
If you struggle to maintain balance in Tree, place your foot on your calf rather than on your inner thigh.

The moon has a rich symbolic significance in yoga mythology. In hatha yoga, for example, the sun and the moon represent the two polar energies of the human body. In fact, the word hatha itself is often divided into its two constituent syllables, “ha†and “thaâ€, which are then esoterically interpreted as signifying the solar and lunar energies respectively.
(are-dah chan-DRAHS-anna)
ardha = half
candra = glittering, shining, having the brilliancy or hue of light (said of the gods); usually translated as “moonâ€
Step 1
Perform Utthita Trikonasana to the right side, with your left hand resting on the left hip. Inhale, bend your right knee, and slide your left foot about 6 to 12 inches forward along the floor. At the same time, reach your right hand forward, beyond the little-toe side of the right foot, at least 12 inches.
Step 2
Exhale, press your right hand and right heel firmly into the floor, and straighten your right leg, simultaneously lifting the left leg parallel (or a little above parallel) to the floor. Extend actively through the left heel to keep the raised leg strong. Be careful not to lock (and so hyperextend) the standing knee: make sure the kneecap is aligned straight forward and isn’t turned inward.
Step 3
Rotate your upper torso to the left, but keep the left hip moving slightly forward. Most beginners should keep the left hand on the left hip and the head in a neutral position, gazing forward.
Step 4
Bear the body’s weight mostly on the standing leg. Press the lower hand lightly to the floor, using it to intelligently regulate your balance. Lift the inner ankle of the standing foot strongly upward, as if drawing energy from the floor into the standing groin. Press the sacrum and scapulas firmly against the back torso, and lengthen the coccyx toward the raised heel.
Step 5
Stay in this position for 30 seconds to 1 minute. Then lower the raised leg to the floor with an exhalation, and return to Trikonasana. Then perform the pose to the left for the same length of time.
Ardha Chandrasana
1
If you have any neck problems, don’t turn your head to look upward; continue looking straight ahead and keep both sides of the neck evenly long.
Balance is always tricky in this pose for beginners. A wall is a useful prop, which you can use in one of two ways. Stand with your back to the wall, one leg’s length away from the wall. Exhale and bend forward into a standing forward bend, then inhale and raise your left leg parallel to the floor and press the left sole against the wall. Start with your toes turned toward the floor. Exhale again and rotate your torso to the left; at the same time, turn the left leg and foot until the inner foot is parallel to the floor. Rest your left hand on the left hip. The pressure of the raised heel against the wall will help you maintain your balance. You can also perform the pose with your back to, and leaning against, the wall.
Advanced students can raise the top arm, with an inhalation, perpendicular to the floor. Firm the top scapula against the back. Imagine there’s a wall in front of you, and press the top hand actively into this pretend wall. Then, if your balance is steady, try slowly rotating the head to gaze up at the raised hand.

We’ll start with a modified version of the pose. The full pose will be described in the Variation section below.
(not-ah-raj-AHS-anna)
nata = actor, dancer, mime
raja = king
Step 1
Stand in Tadasana (Mountain Pose). Inhale, shift your weight onto your right foot, and lift your left heel toward your left buttock as you bend the knee. Press the head of your right thigh bone back, deep into the hip joint, and pull the knee cap up to keep the standing leg straight and strong.
Step 2
There are two variations you might try here with your arms and hands. In either case, try to keep your torso relatively upright. The first is to reach back with your left hand and grasp the outside of your left foot or ankle. To avoid compression in your lower back, actively lift your pubis toward your navel, and at the same time, press your tailbone toward the floor.
Step 3
Begin to lift your left foot up, away from the floor, and back, away from your torso. Extend the left thigh behind you and parallel to the floor. Stretch your right arm forward, in front of your torso, parallel to the floor.
Step 4
The second option with the hands is to sweep your right hand around behind your back and catch hold of the inner left foot. Then sweep the left hand back and grab the outside of the left foot. This variation will challenge your balance even more. Then raise the thigh as described in step 3. This second variation will increase the lift of your chest and the stretch of your shoulders.
Step 5
Stay in the pose for 20 to 30 seconds. Then release the grasp on the foot, place the left foot back onto the floor, and repeat for the same length of time on the other side.
For the full pose, perform step 1 as described above. Then turn your left arm actively outward (so the palm faces away from the side of the torso), bend the elbow, and grip the outside of the left foot. (You can also grab the big toe with the first two fingers and the thumb.) The fingers will cross the top of the foot, the thumb will press against the sole. Inhale, lift the left leg up, and bring the thigh parallel to the floor. As you do this, rotate the left shoulder in such a way that the bent elbow swings around and up, so that it points toward the ceiling. It requires extreme flexibility to externally rotate and flex the shoulder joint in this way. Reach the right arm straight forward, in front of the torso and parallel to the floor. Hold for 20 to 30 seconds, release, and repeat on the second side for the same length of time.
Natarajasana
1
Balance can be difficult in the modified version. Try bracing the free hand against a wall to help you stay stable.
You can move even further into this pose by grasping the raised foot with the off-side hand. Complete the pose as described above in the Full Pose section. Then inhale and swing the free hand first up toward the ceiling, then bend the elbow and reach for the inside of the raised foot.
Natarajasana is usually performed as the final pose of a series of challenging backbends. You’ll probably want to release the spine by coming to Ardha Uttanasana (Half Uttanasana), also known as Right Angle Pose, at the wall or reclining twist.
Many beginners, when lifting the leg, tend to cramp in the back of the thigh. Be sure to keep the ankle of the raised foot flexed; that is, draw the top of the foot toward the shin.
Have your partner help you with balance. As you perform the pose (any of the described variations), have your partner stand behind you. Let him use his best judgment on how to keep you from toppling over, such as bracing your hips with his hands, or helping you to grasp the raised foot.
Ardha Bhekasana

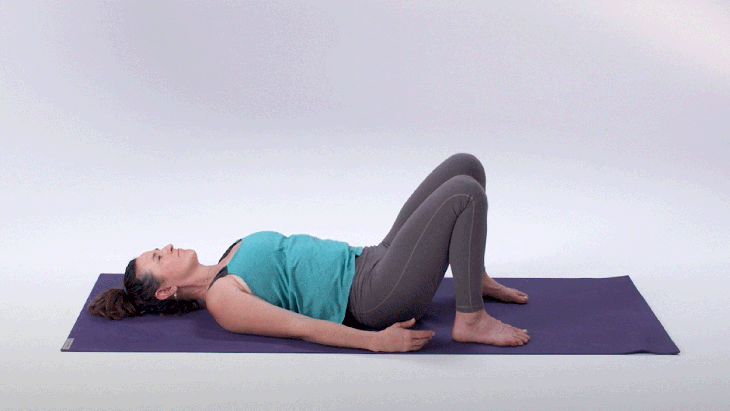
Bridge Pose (Setu Bandha Sarvangasana) is one of the first back-bending yoga postures that many new students learn. And yet, much like the rest of asana practice, it is also a posture from which you can continue learning for your entire lifetime.
“One of my favorite postures for awakening the senses is Setu Bandha Sarvangasana,†says Yoga Journal contributor Claudia Cummins. “This beginning backbend strengthens the legs and hips, massages the spine, and opens the heart. Methodical practice of this asana also offers an opportunity to explore the body and its movements with attention and care. In the process, the mind is calmed and the body becomes energized, leaving the practitioner feeling revitalized and refreshed.â€
This stalwart backbend can be performed restoratively or dynamically—as a resting pose or a strengthener. It will allow you to gain the deep emotional and physical benefits of opening up your chest and thoracic spine.
In Sanskrit, Setu is “bridge,†sarva is “all,†and anga is “limb.†So in Setu Bandha Sarvangasana, the pose you make with your body uses all your limbs to create a bridge. Make a mental picture of a bridge over tranquil water as you breathe deep and muster your energy to lift into this pose.
Sanskrit: Setu Bandha Sarvangasana (SEY-tu-BAHN-duh sahr-vahng-GAHS-ah-nuh)
Pose type: BackbendÂ
Targets: CoreÂ
Why we love it: “Bridge is one pose I can sneak in while getting my kids ready for bed or before or after a workout. In fact, it was one of the first poses I did postpartum—supported, of course, and under the guidance of a physical therapist. On its face, Bridge is not a challenging pose, but when you really tune into your body and breath, even slight adjustments (squeeze those pelvic floor muscles, press those hands into the floor!) make it work for you. As a restorative pose, Bridge is the reset my lower back craves post-walk or hike. But when I want to take it up a notch, I add in some single-leg variations or raise and lower my hips. The next thing I know, I’ve had a little workout—all without standing up!†Erin Skarda, Digital Director
Bridge Pose improves posture and counteracts the effects of prolonged sitting and computer work. It may help relieve low back pain and can counteract slouching and kyphosis (abnormal curvature of the spine). The pose gently stretches your abdomen, chest, and the area around your shoulders while strengthening your back muscles, buttocks (glutes), thighs, and ankles.
To activate your inner thighs and glutes, place a block between your knees and hold it there firmly as you lift and lower your hips.
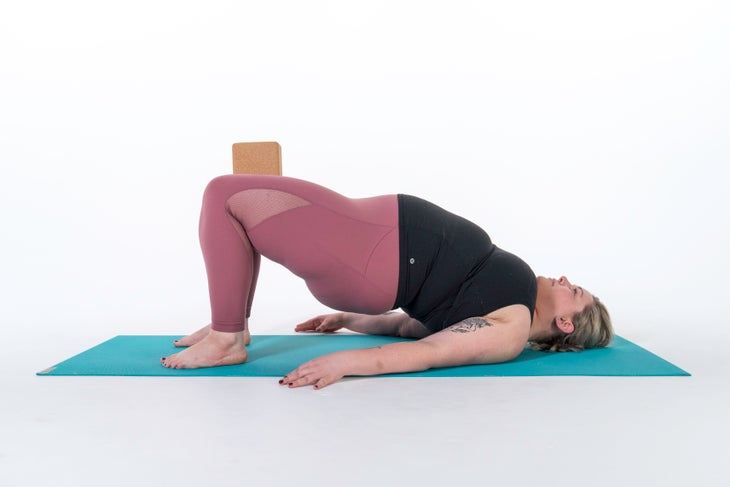
Try with a block between your thighs to focus on inner thigh strength.

Step 1
Start in Dolphin Pose, knees bent. Then walk your feet back until your shoulders are directly over the elbows and your torso is parallel to the floor.
Step 2
Press your inner forearms and elbows firmly against the floor. Firm your shoulder blades against your back and spread them away from the spine. Similarly spread your collarbones away from the sternum.
Step 3
Press your front thighs toward the ceiling, but resist your tailbone toward the floor as you lengthen it toward the heels. Lift the base of your skull away from the back of the neck and look straight down at the floor, keeping the throat and eyes soft.
Step 4
Stay anywhere from 30 seconds to a minute. Then, release your knees to the floor with an exhale.

Step 1
Squat with your feet as close together as possible. (Keep your heels on the floor if you can; otherwise, support them on a folded mat.)
Step 2
Separate your thighs slightly wider than your torso. Exhaling, lean your torso forward and fit it snugly between your thighs.
Step 3
Press your elbows against your inner knees, bringing your palms to together in Anjali Mudra (Salutation Seal), and resist the knees into the elbows. This will help lengthen your front torso.
Step 4
To go further, press your inner thighs against the sides of your torso. Reach your arms forward, then swing them out to the sides and notch your shins into your armpits. Press your finger tips to the floor, or reach around the outside of your ankles and clasp your back heels.
Step 5
Hold the position for 30 seconds to 1 minute, then inhale, straighten the knees, and stand into Uttanasana.

