Pose for the week

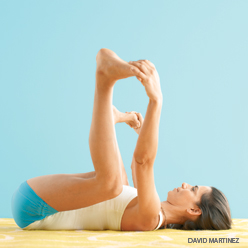
Happy Baby Pose
Ananda Balasana

Step by Step

Lie on your back. With an exhale, bend your knees into your belly.

Inhale, grip the outsides of your feet with your hands (if you have difficulty holding the feet directly with your hands, hold onto a belt looped over each sole.) Open your knees slightly wider than your torso, then bring them up toward your armpits.

Position each ankle directly over the knee, so your shins are perpendicular to the floor. Flex through the heels. Gently push your feet up into your hands (or the belts) as you pull your hands down to create a resistance.

Coax the thighs in toward your torso and down toward the floor as you lengthen the spine—release your tail bone toward the floor and lengthen the base of your skull away from the back of your neck.

Hold the pose steadily for 30 seconds to one minute. Then release the feet back to the floor with an exhale and rest for a few breaths.

No Comments Pose for the week

Pose for the week

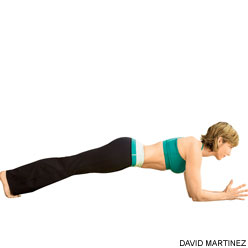
Dolphin Plank Pose

Step by Step

Start in Dolphin Pose, knees bent. Then walk your feet back until your shoulders are directly over the elbows and your torso is parallel to the floor.

Press your inner forearms and elbows firmly against the floor. Firm your shoulder blades against your back and spread them away from the spine. Similarly spread your collarbones away from the sternum.

Press your front thighs toward the ceiling, but resist your tailbone toward the floor as you lengthen it toward the heels. Lift the base of your skull away from the back of the neck and look straight down at the floor, keeping the throat and eyes soft.

Stay anywhere from 30 seconds to a minute. Then, release your knees to the floor with an exhale.

No Comments Pose for the week

Pose for the week

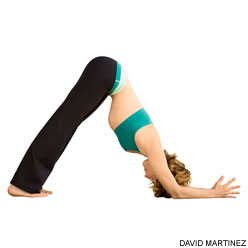
Dolphin Pose

Step by Step

Come onto the floor on your hands and knees. Set your knees directly below your hips and your forearms on the floor with your shoulders directly above your wrists. Firmly press your palms together and your forearms into the floor.

Curl your toes under, then exhale and lift your knees away from the floor. At first keep the knees slightly bent and the heels lifted away from the floor. Lengthen your tailbone away from the back of your pelvis and press it lightly toward the pubis. Against this resistance, lift the sitting bones toward the ceiling, and from your inner ankles draw the inner legs up into the groins.

Continue to press the forearms actively into the floor. Firm your shoulder blades against your back, then widen them away from the spine and draw them toward the tailbone. Hold your head between the upper arms; don’t let it hang or press heavily against the floor.

You can straighten your knees if you like, but if your upper back rounds it’s best to keep them bent. Continue to lengthen your tailbone away from the pelvis and lift the top of your sternum away from the floor.

Stay between 30 seconds to one minute. Then release your knees to the floor with an exhale.

No Comments Pose for the week

Pose for the week

Legs-Up-the-Wall Pose
Viparita Karani

(vip-par-ee-tah car-AHN-ee)
viparita = turned around, reversed, inverted
karani = doing, making, action

Step by Step

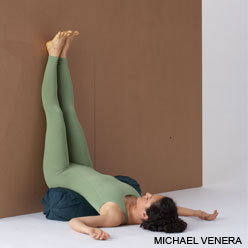
The pose described here is a passive, supported variation of the Shoulderstand-like Viparita Karani. For your support you’ll need one or two thickly folded blankets or a firm round bolster. You’ll also need to rest your legs vertically (or nearly so) on a wall or other upright support.

Before performing the pose, determine two things about your support: its height and its distance from the wall. If you’re stiffer, the support should be lower and placed farther from the wall; if you’re more flexible, use a higher support that is closer to the wall. Your distance from the wall also depends on your height: if you’re shorter move closer to the wall, if taller move farther from the wall. Experiment with the position of your support until you find the placement that works for you.

Start with your support about 5 to 6 inches away from the wall. Sit sideways on right end of the support, with your right side against the wall (left-handers can substitute “left” for “right” in these instructions). Exhale and, with one smooth movement, swing your legs up onto the wall and your shoulders and head lightly down onto the floor. The first few times you do this, you may ignominiously slide off the support and plop down with your buttocks on the floor. Don’t get discouraged. Try lowering the support and/or moving it slightly further off the wall until you gain some facility with this movement, then move back closer to the wall.

Your sitting bones don’t need to be right against the wall, but they should be “dripping” down into the space between the support and the wall. Check that the front of your torso gently arches from the pubis to the top of the shoulders. If the front of your torso seems flat, then you’ve probably slipped a bit off the support. Bend your knees, press your feet into the wall and lift your pelvis off the support a few inches, tuck the support a little higher up under your pelvis, then lower your pelvis onto the support again.

Lift and release the base of your skull away from the back of your neck and soften your throat. Don’t push your chin against your sternum; instead let your sternum lift toward the chin. Take a small roll (made from a towel for example) under your neck if the cervical spine feels flat. Open your shoulder blades away from the spine and release your hands and arms out to your sides, palms up.

Keep your legs relatively firm, just enough to hold them vertically in place. Release the heads of the thigh bones and the weight of your belly deeply into your torso, toward the back of the pelvis. Soften your eyes and turn them down to look into your heart.

Stay in this pose anywhere from 5 to 15 minutes. Be sure not to twist off the support when coming out. Instead, slide off the support onto the floor before turning to the side. You can also bend your knees and push your feet against the wall to lift your pelvis off the support. Then slide the support to one side, lower your pelvis to the floor, and turn to the side. Stay on your side for a few breaths, and come up to sitting with an exhalation.

No Comments Pose for the week

Pose for the week

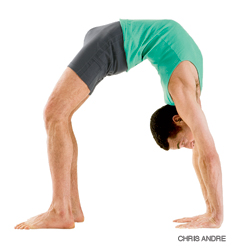
Upward Bow or Wheel Pose
Urdhva Dhanurasana

(OORD-vah don-your-AHS-anna)
urdhva = upward
dhanu = bow

Step by Step

Lie supine on the floor. Bend your knees and set your feet on the floor, heels as close to the sitting bones as possible. Bend your elbows and spread your palms on the floor beside your head, forearms relatively perpendicular to the floor, fingers pointing toward your shoulders.

Pressing your inner feet actively into the floor, exhale and push your tailbone up toward the pubis, firming (but not hardening) the buttocks, and lift the buttocks off the floor. Keep your thighs and inner feet parallel. Take 2 or 3 breaths. Then firmly press the inner hands into the floor and your shoulder blades against the back and lift up onto the crown of your head. Keep your arms parallel. Take 2 or 3 breaths.

Press your feet and hands into the floor, tailbone and shoulder blades against your back, and with an exhalation, lift your head off the floor and straighten your arms. Turn the upper thighs slightly inward and firm the outer thighs. Narrow the hip points and lengthen the tailbone toward the backs of the knees, lifting the pubis toward the navel.

Turn the upper arms outward but keep the weight on the bases of the index fingers. Spread the shoulder blades across the back and let the head hang, or lift it slightly to look down at the floor.

Stay in the pose anywhere from 5 to 10 seconds or more, breathing easily. Repeat anywhere from 3 to 10 times.

No Comments Pose for the week

Pose for the week

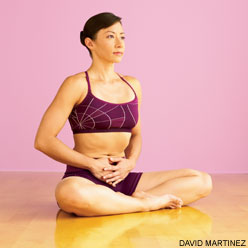
Skull Shining Breath
Kapalabhati Pranayama
(kah-pah-lah-BAH-tee)
kapala = skull
bhati = light (implying perception, knowledge)

Step by Step

Kapalabhati consists of alternating short, explosive exhales and slightly longer, passive inhales. Exhales are generated by powerful contractions of the lower belly (between the pubis and navel), which push air out of the lungs. Inhales are responses to the release of this contraction, which sucks air back into the lungs.

Focus on your lower belly. Many beginners aren’t able to isolate and contract this area. If needed, cup one hand lightly in the other and press them gently against your lower belly.

Now quickly contract (or pump your fisted hands against) your lower belly, pushing a burst of air out of your lungs. Then quickly release the contraction (or your hands), so the belly “rebounds” to suck air into your lungs. Pace yourself slowly at first. Repeat eight to 10 times at about one exhale-inhale cycle every second or two.

As you become more adept at contracting/releasing your lower belly, you can increase your pace to about two exhale-inhale cycles every second. Imagine the exhale sweeping out or “brightening” the inner lining of your skull.

Do 25 to 30 cycles at first. Gradually increase the number of cycles you do each practice to 100 or more.

No Comments Pose for the weekTips

Pose for the week

Dolphin Pose

Step by Step

Come onto the floor on your hands and knees. Set your knees directly below your hips and your forearms on the floor with your shoulders directly above your wrists. Firmly press your palms together and your forearms into the floor.

Curl your toes under, then exhale and lift your knees away from the floor. At first keep the knees slightly bent and the heels lifted away from the floor. Lengthen your tailbone away from the back of your pelvis and press it lightly toward the pubis. Against this resistance, lift the sitting bones toward the ceiling, and from your inner ankles draw the inner legs up into the groins.

Continue to press the forearms actively into the floor. Firm your shoulder blades against your back, then widen them away from the spine and draw them toward the tailbone. Hold your head between the upper arms; don’t let it hang or press heavily against the floor.

You can straighten your knees if you like, but if your upper back rounds it’s best to keep them bent. Continue to lengthen your tailbone away from the pelvis and lift the top of your sternum away from the floor.

Stay between 30 seconds to one minute. Then release your knees to the floor with an exhale.

No Comments Pose for the week

Pose for the week

Crane Pose
Bakasana

(bahk-AHS-anna)
baka = crane

Step by Step

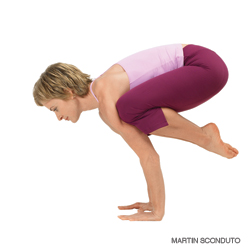
Squat down from Tadasana with your inner feet a few inches apart. If it isn’t possible to keep your heels on the floor, support them on a thickly folded blanket. Separate your knees wider than your hips and lean the torso forward, between the inner thighs. Stretch your arms forward, then bend your elbows, place your hands on the floor and the backs of the upper arms against the shins.

Snuggle your inner thighs against the sides of your torso, and your shins into your armpits, and slide the upper arms down as low onto the shins as possible. Lift up onto the balls of your feet and lean forward even more, taking the weight of your torso onto the backs of the upper arms. In Bakasana you consciously attempt to contract your front torso and round your back completely. To help yourself do this, keep your tailbone as close to your heels as possible.

With an exhalation, lean forward even more onto the backs of your upper arms, to the point where the balls of your feet leave the floor. Now your torso and legs are balanced on the backs of your upper arms. As a beginner at this pose, you might want to stop here, perched securely on the bent arms.

But if you are ready to go further, squeeze the legs against the arms, press the inner hands firmly to the floor and (with an inhalation) straighten the elbows. Seen from the side the arms are angled slightly forward relative to the floor. The inner knees should be glued to the outer arms, high up near the armpits. Keep the head in a neutral position with your eyes looking at the floor, or lift the head slightly, without compressing the back of the neck, and look forward.

Stay in the pose anywhere from 20 seconds to 1 minute. To release, exhale and slowly lower your feet to the floor, back into a squat.

No Comments Pose for the week

Pose for the week

Eight-Angle Pose
Astavakrasana

(ahsh-tah-vah-krahs-anna)

asta = eight
vakra = bent, curved

Step by Step

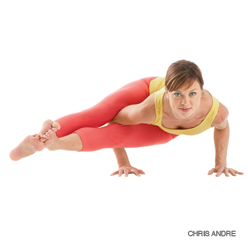
Stand in Tadasana (Mountain Pose), with your feet separated a bit wider than usual. Exhale, bend forward to Uttanasana (Standing Forward Bend), press your hands to the floor outside your feet. Then with your knees slightly bent, slip your right arm to the inside and then behind your right leg, and finally press the hand on the floor just outside your right foot. Work your right arm across the back of the right knee, until the knee is high up on the back of your right shoulder.

Brace your shoulder against the knee and slide your left foot to the right. Cross the left ankle in front of the right and hook the ankles. Lean slightly to the left, taking more weight on your left arm, and begin to lift your feet a few inches off the floor.

With the right leg supported on the shoulder, exhale and bend your elbows. Lean your torso forward and lower it toward parallel to the floor; at the same time, straighten your knees and extend your legs out to the right, parallel to the floor (and perpendicular to your torso). Squeeze your upper right arm between your thighs. Use that pressure to help twist your torso to the left. Keep your elbows in close to the torso. Look at the floor.

Hold for 30 seconds to a minute. Then straighten your arms slowly, lift your torso back to upright, bend your knees, unhook your ankles, and return your feet to the floor. Stand back and rest in Uttanasana for a few breaths. Then repeat the pose for the same length of time to the left.

No Comments Pose for the week

Pose for the week

Camel Pose
Ustrasana

(oosh-TRAHS-anna)
ustra = camel

Step by Step

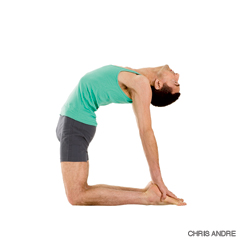
Kneel on the floor with your knees hip width and thighs perpendicular to the floor. Rotate your thighs inward slightly, narrow your hip points, and firm but don’t harden your buttocks. Imagine that you’re drawing your sitting bones up, into your torso. Keep your outer hips as soft as possible. Press your shins and the tops of your feet firmly into floor.

Rest your hands on the back of your pelvis, bases of the palms on the tops of the buttocks, fingers pointing down. Use your hands to spread the back pelvis and lengthen it down through your tail bone. Then lightly firm the tail forward, toward the pubis. Make sure though that your front groins don’t “puff” forward. To prevent this, press your front thighs back, countering the forward action of your tail. Inhale and lift your heart by pressing the shoulder blades against your back ribs.

Now lean back against the firmness of the tail bone and shoulder blades. For the time being keep your head up, chin near the sternum, and your hands on the pelvis. Beginners probably won’t be able to drop straight back into this pose, touching the hands to the feet simultaneously while keeping the thighs perpendicular to the floor. If you need to, tilt the thighs back a little from the perpendicular and minimally twist to one side to get one hand on the same-side foot. Then press your thighs back to perpendicular, turn your torso back to neutral, and touch the second hand to its foot. If you’re not able to touch your feet without compressing your lower back, turn your toes under and elevate your heels.

See that your lower front ribs aren’t protruding sharply toward the ceiling, which hardens the belly and compresses the lower back. Release the front ribs and lift the front of the pelvis up, toward the ribs. Then lift the lower back ribs away from the pelvis to keep the lower spine as long as possible. Press your palms firmly against your soles (or heels), with the bases of the palms on the heels and the fingers pointing toward the toes. Turn your arms outwardly so the elbow creases face forward, without squeezing the shoulder blades together. You can keep your neck in a relatively neutral position, neither flexed nor extended, or drop your head back. But be careful not to strain your neck and harden your throat.

Stay in this pose anywhere from 30 seconds to a minute. To exit, bring your hands onto the front of your pelvis, at the hip points. Inhale and lift the head and torso up by pushing the hip points down, toward the floor. If your head is back, lead with your heart to come up, not by jutting the chin toward the ceiling and leading with your brain. Rest in Child’s Pose for a few breaths.

No Comments Pose for the week