Pose for the week

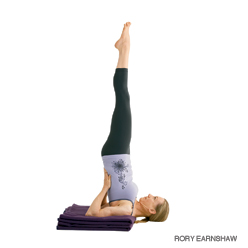
Supported Shoulderstand
Salamba Sarvangasana

(sah-LOM-bah sar-van-GAHS-anna)
salamba = with support (sa = with
alamba = support)
sarva = all
anga = limb. There are variations of Shoulderstand that are “unsupported” = niralamba, pronounced near-ah-LOM-bah)

Step by Step

Fold two or more firm blankets into rectangles measuring about 1 foot by 2 feet, and stack them one on top of the other. You can place a sticky mat over the blankets to help the upper arms stay in place while in the pose. Then lie on the blankets with your shoulders supported (and parallel to one of the longer edges) and your head on the floor. Lay your arms on the floor alongside your torso, then bend your knees and set your feet against the floor with the heels close to the sitting bones. Exhale, press your arms against the floor, and push your feet away from the floor, drawing your thighs into the front torso.

Continue to lift by curling the pelvis and then the back torso away from the floor, so that your knees come toward your face. Stretch your arms out parallel to the edge of the blanket and turn them outward so the fingers press against the floor (and the thumbs point behind you). Bend your elbows and draw them toward each other. Lay the backs of your upper arms on the blanket and spread your palms against the back of your torso. Raise your pelvis over the shoulders, so that the torso is relatively perpendicular to the floor. Walk your hands up your back (toward the floor) without letting the elbows slide too much wider than shoulder width.

Inhale and lift your bent knees toward the ceiling, bringing your thighs in line with your torso and hanging the heels down by your buttocks. Press your tailbone toward your pubis and turn the upper thighs inward slightly. Finally inhale and straighten the knees, pressing the heels up toward the ceiling. When the backs of the legs are fully lengthened, lift through the balls of the big toes so the inner legs are slightly longer than the outer.

Soften the throat and tongue. Firm the shoulder blades against the back, and move the sternum toward the chin. Your forehead should be relatively parallel to the floor, your chin perpendicular. Press the backs of your upper arms and the tops of your shoulders actively into the blanket support, and try to lift the upper spine away from the floor. Gaze softly at your chest.

As a beginning practitioner stay in the pose for about 30 seconds. Gradually add 5 to 10 seconds to your stay every day or so until you can comfortably hold the pose for 3 minutes. Then continue for 3 minutes each day for a week or two, until you feel relatively comfortable in the pose. Again gradually and 5 to 10 seconds onto your stay every day or so until you can comfortably hold the pose for 5 minutes. To come down, exhale, bend your knees into your torso again, and roll your back torso slowly and carefully onto the floor, keeping the back of your head on the floor.
No Comments Pose for the week

Pose for the week

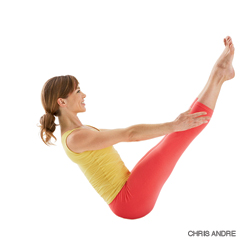
Full Boat Pose
Paripurna Navasana

(par-ee-POOR-nah nah-VAHS-anna)
paripurna = full, entire, complete
nava = boat

Step by Step

Sit on the floor with your legs straight in front of you. Press your hands on the floor a little behind your hips, fingers pointing toward the feet, and strengthen the arms. Lift through the top of the sternum and lean back slightly. As you do this make sure your back doesn’t round; continue to lengthen the front of your torso between the pubis and top sternum. Sit on the “tripod” of your two sitting bones and tailbone.

Exhale and bend your knees, then lift your feet off the floor, so that the thighs are angled about 45-50 degrees relative to the floor. Lengthen your tailbone into the floor and lift your pubis toward your navel. If possible, slowly straighten your knees, raising the tips of your toes slightly above the level of your eyes. If this isn’t possible remain with your knees bent, perhaps lifting the shins parallel to the floor.

Stretch your arms alongside the legs, parallel to each other and the floor. Spread the shoulder blades across your back and reach strongly out through the fingers. If this isn’t possible, keep the hands on the floor beside your hips or hold on to the backs of your thighs.

While the lower belly should be firm, it shouldn’t get hard and thick. Try to keep the lower belly relatively flat. Press the heads of the thigh bones toward the floor to help anchor the pose and lift the top sternum. Breathe easily. Tip the chin slightly toward the sternum so the base of the skull lifts lightly away from the back of the neck.

At first stay in the pose for 10-20 seconds. Gradually increase the time of your stay to 1 minute. Release the legs with an exhalation and sit upright on an inhalation.

No Comments Pose for the week

Pose for the week

Marichi’s Pose
Marichyasana III
mar-ee-chee-AHS-anna

Marichi = literally means a ray of light (of the sun or moon). Marichi is the son of Brahma and chief of the Maruts (“shining ones”), the war-like storm gods. He’s one of the seven (sometimes 10 or 12) seers (rishis) or lords of creation (prajapatis), who intuitively “see” and declare the divine law of the universe (dharma). Marichi is the great-grandfather of Manu (“man, thinking, intelligent”), the Vedic Adam and the “father” of humanity.

Step by Step

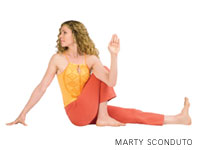
Sit in Dandanasa (Staff Pose), then bend your right knee and put the foot on the floor, with the heel as close to the right sitting bone as possible. Keep the left leg strong and rotated slightly inward; ground the head of the thigh bone into the floor. Press the back of the left heel and the base of the big toe away from the pelvis. Also press the inner right foot actively into the floor, but soften the inner right groin to receive the pubis as you twist. Grounding the straight-leg thigh and bent-knee foot will help you lengthen your spine, which is always the first prerequisite of a successful twist.

With an exhalation, rotate your torso to the right and wrap your left arm around the right thigh. Hold the outer thigh with your left hand, then pull the thigh up as you release the right hip toward the floor. Press your right fingertips onto the floor just behind your pelvis to lift the torso slightly up and forward.

Remember to keep your straight leg and bent-knee foot grounded. Sink the inner right groin deeper into the pelvis, then lengthen your front belly up out of the groin along the inner right thigh. Continue lengthening the spine with each inhalation, and twist a little more with each exhalation. Hug the thigh to your belly, then lean back against your shoulder blades into an upper-back backbend. Gently turn your head to the right to complete the twist in your cervical spine.

Stay in the pose for 30 seconds to 1 minute. Then release with an exhalation, reverse the legs and twist to the left for an equal length of time.

No Comments Pose for the week

Pose for the week

Do the Right Thing Meditation
Dhyana

Step by Step

First, seek guidance. Begin by checking in with the wisdom, “the sacred texts,” of your tradition. Examples are the yamas and niyamas of Patanjali’s Yoga Sutra (nonviolence, nonstealing, contentment, truthfulness, and the rest); the Buddha’s eightfold path (right speech, right livelihood, and so on); some of the precepts of Taoism (to create without owning, to give without expecting, to fulfill without claiming); Christ’s Beatitudes; the Bhagavad Gita; and instructions from teachers.

Next, look around for good examples. This second yardstick for right action invites us to channel the discernment we’ve received, often unconsciously, from observing people who consistently make elevated moral and ethical choices. This is the basic “What would Martin Luther King do?” question. You could also look to your grandmother, the teacher who spent her after-school hours helping failing kids, or a friend who always “gets it right.”

The third step is to see what feels right for you. You might know what the books say is the right thing to do. You might long to make the decision that Jesus or the Buddha or one of your more saintly friends would have made. But if something feels wrong for you personally, then it probably is not your dharma, and that means that you probably shouldn’t do it.

The fourth criterion, do what’s best for all, cuts to the heart of personal dharma. Doing what’s best for all involves a wholesome resolve, or an unselfish motivation. It involves the desire to help others, to serve the situation, and to accept responsibility for creating positive change.

Finally, all these methods for following the thread of dharma really work only when we’re in touch with our spiritual core, the authentic, essential Self we experience when we enter deep into our own being. Different traditions call that essential Self by different names-the heart, the inner Self, the Tao, pure Awareness, Presence, or basic emptiness-but one thing all agree on: When we’re in touch with it, we are in touch with our highest dharma.

No Comments Pose for the week

Pose for the week

Feathered Peacock Pose
Pincha Mayurasana

(pin-cha my-your-AHS-anna) piñca = feather
mayura = peacock

Step by Step

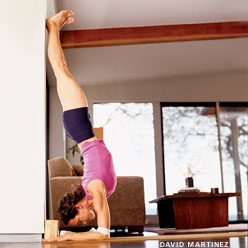
Perform a modified Adho Muhka Svanasana at your yoga wall, with your palms and forearms on the floor. Your fingertips should be right at the base of the wall, and your forearms parallel to each other at shoulder width. This pose isn’t quite as scary as Adho Mukha Vrksasana; it has a firmer base of support, and the head isn’t as far away from the floor. But it can still be somewhat intimidating. To ready yourself for and secure yourself in this inversion, firm your shoulder blades against your back torso and pull them toward your tailbone. Then rotate your upper arms outward, to keep the shoulder blades broad, and hug your forearms inward. Finally spread your palms and press your inner wrists firmly against the floor.

Now bend one knee and step the foot in, closer to the wall (let’s say the left leg), but keep the other (i.e. right) leg active by extending through the heel. Then take a few practice hops before you try to launch yourself upside down. Sweep your right leg through a wide arc toward the wall and kick your left foot off the floor, immediately pushing through the heel to straighten the leg. Hop up and down like this several times, each time pushing off the floor a little higher. Exhale deeply each time you hop.

Hopping up and down like this may be all you can manage for now. Regularly practice your strength poses, like Adho Mukha Svanasana (or the modified version that’s the beginning position here), Plank Pose, and Chaturanga Dandasana. Eventually you’ll be able to kick all the way into the pose. At first your heels may crash into the wall, but again with more practice you’ll be able to swing your heels up lightly to the wall.

If your armpits and groins are tight, your lower back may be deeply arched. To lengthen it, draw your front ribs into your torso, reach your tailbone toward your heels, and slide your heels higher up the wall. Draw the navel toward the spine. Squeeze the outer legs together and roll the thighs in. In Pincha Mayurasana your head should be off the floor; hang it from a spot between your shoulder blades and gaze out into the center of the room.

Stay in the pose 10 to 15 seconds. Gradually work your way up to 1 minute. When you come down, be sure not to sink onto the shoulders. Keep your shoulder blades lifted and broad, and take one foot down at a time with an exhalation. Lift into Adho Mukha Svanasana for 30 seconds to a minute. We tend to kick up with the same leg all the time: be sure to alternate your kicking leg, one day right, next day left.

No Comments Pose for the week

Yoga Poses

Scale Pose
Tolasana
(toe-LAHS-anna)
tola = literally “poising one’s self”; usually rendered as “balance” or “scale”

Step by Step

Perform Padmasana (Lotus Pose). Place the palms on the floor beside the hips.

Exhale, push the hands against the floor, contract the abdominal muscles, and lift the legs and buttocks away from the floor.

Hold suspended for 10 to 15 seconds. Then lower your legs and buttocks on an exhalation, change the cross of the legs, and repeat for the same length of time.

No Comments Pose for the week

Pose for the week

Reclining Bound Angle Pose
Supta Baddha Konasana

(SOUP-tah BAH-dah cone-NAHS-anna) supta = lying down, reclining baddha = bound kona = angle

Step by Step

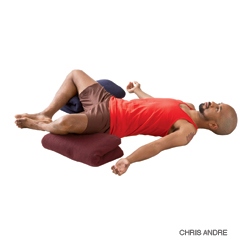
Perform Baddha Konasana. Exhale and lower your back torso toward the floor, first leaning on your hands. Once you are leaning back on your forearms, use your hands to spread the back of your pelvis and release your lower back and upper buttocks through your tailbone. Bring your torso all the way to the floor, supporting your head and neck on a blanket roll or bolster if needed.

With your hands grip your topmost thighs and rotate your inner thighs externally, pressing your outer thighs away from the sides of your torso. Next slide your hands along your outer thighs from the hips toward the knees and widen your outer knees away from your hips. Then slide your hands down along your inner thighs, from the knees to the groins. Imagine that your inner groins are sinking into your pelvis. Push your hip points together, so that while the back pelvis widens, the front pelvis narrows. Lay your arms on the floor, angled at about 45 degrees from the sides of your torso, palms up.

The natural tendency in this pose is to push the knees toward the floor in the belief that this will increase the stretch of the inner thighs and groins. But especially if your groins are tight, pushing the knees down will have just the opposite of the intended effect: The groins will harden, as will your belly and lower back. Instead, imagine that your knees are floating up toward the ceiling and continue settling your groins deep into your pelvis. As your groins drop toward the floor, so will your knees.

To start, stay in this pose for one minute. Gradually extend your stay anywhere from five to 10 minutes. To come out, use your hands to press your thighs together, then roll over onto one side and push yourself away from the floor, head trailing the torso.

No Comments Pose for the week

Pose for the week

Gate Pose
Parighasana
(par-ee-GOSS-anna)
parigha = an iron bar or beam used for locking or shutting a gate

The pose described immediately below is a simplified variation of the full pose. Then we describe the full pose afterward.

Step by Step

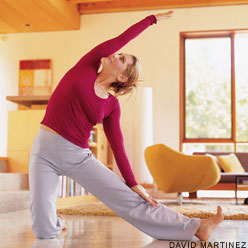
Kneel on the floor. Stretch your right leg out to the right and press the foot to the floor. Keep your left knee directly below your left hip (so the thigh is perpendicular to the floor), and align your right heel with the left knee. Turn your pelvis slightly to the right (so the left hip point comes forward of the right), but turn your upper torso back to the left. Point the kneecap toward the ceiling, which will require you to turn your right leg out.

As you inhale, bring your arms out to your sides, parallel to the floor, palms down. Bend to the right over the plane of the right leg and lay your right hand down on the shin, ankle, or the floor outside the right leg. Contract the right side of the torso and stretch the left. Place your left hand on the outer left hip and push the pelvis down toward the floor. Then slip the hand up to the lower left ribs and lift them toward the shoulder, creating space in the left waist.

With an inhalation, sweep the left arm over the back of the left ear. The side bend tends to drop the torso toward the floor. Without pushing the left hip back (continue to roll it slightly forward), turn the upper torso away from the floor.

Stay in this pose anywhere from 30 seconds to a minute. Come up as you inhale, reaching through the top arm to draw the torso upright. Bring the right knee back beside the left, and repeat with the legs reversed.

Full Pose
Full Parighasana is a deep side bend. From the starting position described in Step 2 above, lean to the side over the straight leg. Lower the underside of the torso as close as possible to the top of the straight leg. Press the back of the lower hand on the top of the foot, then sweep the top arm over the back of the ear and join the palms. Finish as described in Step 4 above.

No Comments Pose for the week

Pose for the week

Astavakrasana
(ahsh-tah-vah-krahs-anna)

asta = eight
vakra = bent, curved

Step by Step

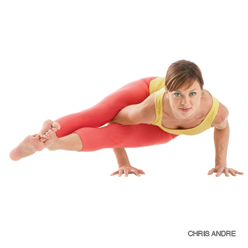
Stand in Tadasana (Mountain Pose), with your feet separated a bit wider than usual. Exhale, bend forward to Uttanasana (Standing Forward Bend), press your hands to the floor outside your feet. Then with your knees slightly bent, slip your right arm to the inside and then behind your right leg, and finally press the hand on the floor just outside your right foot. Work your right arm across the back of the right knee, until the knee is high up on the back of your right shoulder.

Brace your shoulder against the knee and slide your left foot to the right. Cross the left ankle in front of the right and hook the ankles. Lean slightly to the left, taking more weight on your left arm, and begin to lift your feet a few inches off the floor.

With the right leg supported on the shoulder, exhale and bend your elbows. Lean your torso forward and lower it toward parallel to the floor; at the same time, straighten your knees and extend your legs out to the right, parallel to the floor (and perpendicular to your torso). Squeeze your upper right arm between your thighs. Use that pressure to help twist your torso to the left. Keep your elbows in close to the torso. Look at the floor.

Hold for 30 seconds to a minute. Then straighten your arms slowly, lift your torso back to upright, bend your knees, unhook your ankles, and return your feet to the floor. Stand back and rest in Uttanasana for a few breaths. Then repeat the pose for the same length of time to the left.

No Comments Pose for the week

Pose for the week

Half Lord of the Fishes Pose
Ardha Matsyendrasana

(ARE-dah MOT-see-en-DRAHS-anna)
ardha = half
Matsyendra = king of the fish (matsya = fish
indra = ruler), a legendary teacher of yoga

Step by Step

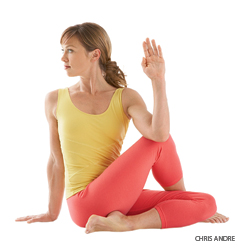
Sit on the floor with your legs straight out in front of you, buttocks supported on a folded blanket. Bend your knees, put your feet on the floor, then slide your left foot under your right leg to the outside of your right hip. Lay the outside of the left leg on the floor. Step the right foot over the left leg and stand it on the floor outside your left hip. The right knee will point directly up at the ceiling.

Exhale and twist toward the inside of the right thigh. Press the right hand against the floor just behind your right buttock, and set your left upper arm on the outside of your right thigh near the knee. Pull your front torso and inner right thigh snugly together.

Press the inner right foot very actively into the floor, release the right groin, and lengthen the front torso. Lean the upper torso back slightly, against the shoulder blades, and continue to lengthen the tailbone into the floor.

You can turn your head in one of two directions: Continue the twist of the torso by turning it to the right; or counter the twist of the torso by turning it left and looking over the left shoulder at the right foot.

With every inhalation lift a little more through the sternum, pushing the fingers against the floor to help. Twist a little more with every exhalation. Be sure to distribute the twist evenly throughout the entire length of the spine; don’t concentrate it in the lower back. Stay for 30 seconds to 1 minute, then release with an exhalation, return to the starting position, and repeat to the left for the same length of time.

No Comments Pose for the week