Pose for the week

Plow Pose
Halasana

(hah-LAHS-anna)
hala = plow

Step by Step

From Salamba Sarvangasana, exhale and bend from the hip joints to slowly lower your toes to the floor above and beyond your head. As much as possible, keep your torso perpendicular to the floor and your legs fully extended.

With your toes on the floor, lift your top thighs and tailbone toward the ceiling and draw your inner groins deep into the pelvis. Imagine that your torso is hanging from the height of your groins. Continue to draw your chin away from your sternum and soften your throat.

You can continue to press your hands against the back torso, pushing the back up toward the ceiling as you press the backs of the upper arms down, onto your support. Or you can release your hands away from your back and stretch the arms out behind you on the floor, opposite the legs. Clasp the hands and press the arms actively down on the support as you lift the thighs toward the ceiling.

Halasana is usually performed after Sarvangasana for anywhere from 1 to 5 minutes. To exit the pose bring your hands onto your back again, lift back into Sarvangasana with an exhalation, then roll down onto your back, or simply roll out of the pose on an exhalation.

No Comments Pose for the week

Pose for the week

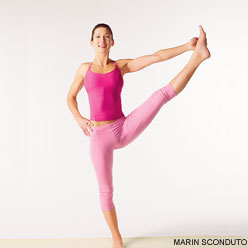
Extended Hand-To-Big-Toe Pose
Utthita Hasta Padangustasana

Step by Step

From Tadasana, bring your left knee toward your belly.

Reach your left arm inside the thigh, cross it over the front ankle, and hold the outside of your left foot. If your hamstrings are tight, hold a strap looped around the left sole.

Firm the front thigh muscles of the standing leg, and press the outer thigh inward.

Inhale and extend the left leg forward. Straighten the knee as much as possible. If you’re steady, swing the leg out to the side. Breathe steadily; breathing takes concentration, but it helps you balance.

Hold for 30 seconds, then swing the leg back to center with an inhale, and lower the foot to the floor with an exhale. Repeat on the other side for the same length of time.

No Comments Pose for the week

Pose for the week

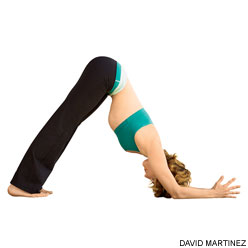
Dolphin Pose

Step by Step

Come onto the floor on your hands and knees. Set your knees directly below your hips and your forearms on the floor with your shoulders directly above your wrists. Firmly press your palms together and your forearms into the floor.

Curl your toes under, then exhale and lift your knees away from the floor. At first keep the knees slightly bent and the heels lifted away from the floor. Lengthen your tailbone away from the back of your pelvis and press it lightly toward the pubis. Against this resistance, lift the sitting bones toward the ceiling, and from your inner ankles draw the inner legs up into the groins.

Continue to press the forearms actively into the floor. Firm your shoulder blades against your back, then widen them away from the spine and draw them toward the tailbone. Hold your head between the upper arms; don’t let it hang or press heavily against the floor.

You can straighten your knees if you like, but if your upper back rounds it’s best to keep them bent. Continue to lengthen your tailbone away from the pelvis and lift the top of your sternum away from the floor.

Stay between 30 seconds to one minute. Then release your knees to the floor with an exhale.

No Comments Pose for the week

Pose for the week

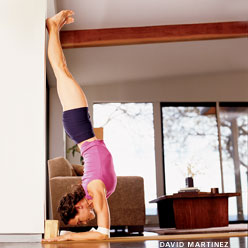
Feathered Peacock Pose
Pincha Mayurasana

(pin-cha my-your-AHS-anna) piñca = feather
mayura = peacock

Step by Step

Perform a modified Adho Muhka Svanasana at your yoga wall, with your palms and forearms on the floor. Your fingertips should be right at the base of the wall, and your forearms parallel to each other at shoulder width. This pose isn’t quite as scary as Adho Mukha Vrksasana; it has a firmer base of support, and the head isn’t as far away from the floor. But it can still be somewhat intimidating. To ready yourself for and secure yourself in this inversion, firm your shoulder blades against your back torso and pull them toward your tailbone. Then rotate your upper arms outward, to keep the shoulder blades broad, and hug your forearms inward. Finally spread your palms and press your inner wrists firmly against the floor.

Now bend one knee and step the foot in, closer to the wall (let’s say the left leg), but keep the other (i.e. right) leg active by extending through the heel. Then take a few practice hops before you try to launch yourself upside down. Sweep your right leg through a wide arc toward the wall and kick your left foot off the floor, immediately pushing through the heel to straighten the leg. Hop up and down like this several times, each time pushing off the floor a little higher. Exhale deeply each time you hop.

Hopping up and down like this may be all you can manage for now. Regularly practice your strength poses, like Adho Mukha Svanasana (or the modified version that’s the beginning position here), Plank Pose, and Chaturanga Dandasana. Eventually you’ll be able to kick all the way into the pose. At first your heels may crash into the wall, but again with more practice you’ll be able to swing your heels up lightly to the wall.

If your armpits and groins are tight, your lower back may be deeply arched. To lengthen it, draw your front ribs into your torso, reach your tailbone toward your heels, and slide your heels higher up the wall. Draw the navel toward the spine. Squeeze the outer legs together and roll the thighs in. In Pincha Mayurasana your head should be off the floor; hang it from a spot between your shoulder blades and gaze out into the center of the room.

Stay in the pose 10 to 15 seconds. Gradually work your way up to 1 minute. When you come down, be sure not to sink onto the shoulders. Keep your shoulder blades lifted and broad, and take one foot down at a time with an exhalation. Lift into Adho Mukha Svanasana for 30 seconds to a minute. We tend to kick up with the same leg all the time: be sure to alternate your kicking leg, one day right, next day left.

No Comments Pose for the week

Pose for the week

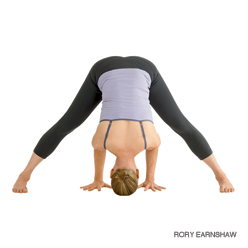
Wide-Legged Forward Bend
Prasarita Padottanasana

(pra-sa-REE-tah pah-doh-tahn-AHS-anna)
prasarita = stretched out, expanded, spread, with outstretched limbs
pada = foot
ut = intense
tan = to stretch or extend (compare the Latin verb tendere, “to stretch or extend”)

Step by Step

Stand in Tadasana (Mountain Pose), facing one of the long edges of your sticky mat, then step or lightly hop your feet apart anywhere from 3 to 4 1/2 feet (depending on your height: taller people should step wider). Rest your hands on your hips. Make sure your inner feet are parallel to each other. Lift your inner arches by drawing up on the inner ankles, and press the outer edges of your feet and ball of the big toe firmly into the floor. Engage the thigh muscles by drawing them up. Inhale and lift your chest, making the front torso slightly longer than the back.

Exhale and, maintaining the length of the front torso, lean the torso forward from the hip joints. As your torso approaches parallel to the floor, press your fingertips onto the floor directly below your shoulders. Extend your elbows fully. Your legs and arms then should be perpendicular to the floor and parallel to each other. Move your spine evenly into the back torso so that your back is slightly concave from the tailbone to the base of the skull. Bring your head up, keeping the back of the neck long, and direct your gaze upward toward the ceiling.

Push your top thighs straight back to help lengthen the front torso, and draw the inner groins away from each other to widen the base of your pelvis. Take a few breaths. As you maintain the concavity of your back and the forward lift of your sternum, walk your fingertips between your feet. Take a few more breaths and then, with an exhalation, bend your elbows and lower your torso and head into a full forward bend. Make sure as you move down that you keep your front torso as long as possible. If possible rest the crown of your head on the floor.

Press your inner palms actively into the floor, fingers pointing forward. If you have the flexibility to move your torso into a full forward bend, walk your hands back until your forearms are perpendicular to the floor and your upper arms parallel. Be sure to keep your arms parallel to each other and widen the shoulder blades across the back. Draw your shoulders away from your ears.

Stay in the pose anywhere from 30 seconds to 1 minute. To come out, bring your hands back on the floor below your shoulders and lift and lengthen your front torso. Then with an inhalation, rest your hands on your hips, pull your tail bone down toward the floor, and swing the torso up. Walk or hop your feet back into Tadasana.

No Comments Pose for the week

Pose for the week

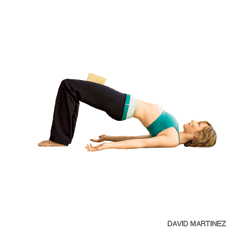
Bridge Pose

Setu Bandha Sarvangasana
(SET-too BAHN-dah)
setu = dam, dike, or bridge
bandha = lock

Step by Step

Lie supine on the floor, and if necessary, place a thickly folded blanket under your shoulders to protect your neck. Bend your knees and set your feet on the floor, heels as close to the sitting bones as possible.

Exhale and, pressing your inner feet and arms actively into the floor, push your tailbone upward toward the pubis, firming (but not hardening) the buttocks, and lift the buttocks off the floor. Keep your thighs and inner feet parallel. Clasp the hands below your pelvis and extend through the arms to help you stay on the tops of your shoulders.

Lift your buttocks until the thighs are about parallel to the floor. Keep your knees directly over the heels, but push them forward, away from the hips, and lengthen the tailbone toward the backs of the knees. Lift the pubis toward the navel.

Lift your chin slightly away from the sternum and, firming the shoulder blades against your back, press the top of the sternum toward the chin. Firm the outer arms, broaden the shoulder blades, and try to lift the space between them at the base of the neck (where it’s resting on the blanket) up into the torso.

Stay in the pose anywhere from 30 seconds to 1 minute. Release with an exhalation, rolling the spine slowly down onto the floor.

No Comments Pose for the week

Yoga Pose for the week

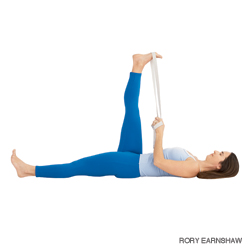
Reclining Big Toe Pose
Supta Padangusthasana

(soup-TAH pod-ang-goosh-TAHS-anna)
supta = lying down, reclining
pada = foot
angusta = big toe

Step by Step

Lie supine on the floor, legs strongly extended. If your head doesn’t rest comfortably on the floor, support it on a folded blanket. Exhale, bend the left knee, and draw the thigh into your torso. Hug the thigh to your belly. Press the front of the right thigh heavily to the floor, and push actively through the right heel.

Loop a strap around the arch of the left foot and hold the strap in both hands. Inhale and straighten the knee, pressing the left heel up toward the ceiling. Walk your hands up the strap until the elbows are fully extended. Broaden the shoulder blades across your back. Keeping the hands as high on the strap as possible, press the shoulder blades lightly into the floor. Widen the collarbones away from the sternum.

Extend up first through the back of the left heel, and once the back of the leg between the heel and sitting bone is fully lengthened, lift through the ball of the big toe. Begin with the raised leg perpendicular to the floor. Release the head of the thigh bone more deeply into the pelvis and, as you do, draw the foot a little closer to your head, increasing the stretch on the back of the leg.

You can stay here in this stretch, or turn the leg outward from the hip joint, so the knee and toes look to the left. Pinning the top of the right thigh to the floor, exhale and swing the left leg out to the left and hold it a few inches off the floor. Continue rotating the leg. As you feel the outer thigh move away from the left side of the torso, try to bring the left foot in line with the left shoulder joint. Inhale to bring the leg back to vertical. Lighten your grip on the strap as you do, so that you challenge the muscles of the inner thigh and hip to do the work.

Hold the vertical position of the leg anywhere from 1 to 3 minutes, and the side position for an equal length of time. Once you have returned to vertical release the strap, hold the leg in place for 30 seconds or so, then slowly release as you exhale. Repeat on the right for the same length of time.

No Comments Pose for the week

Pose for the week

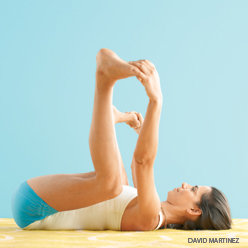
Happy Baby Pose
Ananda Balasana

Step by Step

Lie on your back. With an exhale, bend your knees into your belly.

Inhale, grip the outsides of your feet with your hands (if you have difficulty holding the feet directly with your hands, hold onto a belt looped over each sole.) Open your knees slightly wider than your torso, then bring them up toward your armpits.

Position each ankle directly over the knee, so your shins are perpendicular to the floor. Flex through the heels. Gently push your feet up into your hands (or the belts) as you pull your hands down to create a resistance.

Coax the thighs in toward your torso and down toward the floor as you lengthen the spine—release your tail bone toward the floor and lengthen the base of your skull away from the back of your neck.

Hold the pose steadily for 30 seconds to one minute. Then release the feet back to the floor with an exhale and rest for a few breaths.

No Comments Pose for the week

Pose for the week

One-Legged King Pigeon Pose II
Eka Pada Rajakapotasana II
(A-kah pah-dah rah-jah-kah-poh-tahs-anna)

eka = one
pada = foot
raja = king
kapota = pigeon (or dove)

Step by Step

Sit in Dandasana (Staff Pose). Bend your right knee and place the foot on the floor just in front of the right sitting bone. The shin will be approximately perpendicular to the floor.

Then shift slightly to the right and swing your left leg straight back behind the torso. Lay it on the floor fully extended, with the front of the leg (and top of the foot) on the floor.

Bend your left knee and raise the shin approximately perpendicular to the floor. Your body weight will balance on the right foot and left knee (and thigh if you’re very flexible). To stabilize your position, push your right knee forward until it protrudes out slightly beyond the right toes.

Inhale as you lift your right arm up and, bending the elbow, exhale and take the left foot. Then do the same with your left arm. Holding the foot firmly, lift your chest and drop your head back toward the sole of your left foot. Press your elbows toward the ceiling. Hold for about 15 to 30 seconds, breathing as smoothly as possible.

Exhale and release the left foot and bring the leg back to the floor. Repeat steps 1 through 4 on the left side for the same length of time.

No Comments Pose for the week

Pose for the week

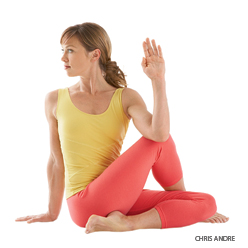
Half Lord of the Fishes Pose
Ardha Matsyendrasana

(ARE-dah MOT-see-en-DRAHS-anna)
ardha = half
Matsyendra = king of the fish (matsya = fish
indra = ruler), a legendary teacher of yoga

Step by Step

Sit on the floor with your legs straight out in front of you, buttocks supported on a folded blanket. Bend your knees, put your feet on the floor, then slide your left foot under your right leg to the outside of your right hip. Lay the outside of the left leg on the floor. Step the right foot over the left leg and stand it on the floor outside your left hip. The right knee will point directly up at the ceiling.

Exhale and twist toward the inside of the right thigh. Press the right hand against the floor just behind your right buttock, and set your left upper arm on the outside of your right thigh near the knee. Pull your front torso and inner right thigh snugly together.

Press the inner right foot very actively into the floor, release the right groin, and lengthen the front torso. Lean the upper torso back slightly, against the shoulder blades, and continue to lengthen the tailbone into the floor.

You can turn your head in one of two directions: Continue the twist of the torso by turning it to the right; or counter the twist of the torso by turning it left and looking over the left shoulder at the right foot.

With every inhalation lift a little more through the sternum, pushing the fingers against the floor to help. Twist a little more with every exhalation. Be sure to distribute the twist evenly throughout the entire length of the spine; don’t concentrate it in the lower back. Stay for 30 seconds to 1 minute, then release with an exhalation, return to the starting position, and repeat to the left for the same length of time.

No Comments Pose for the week