Poses

Pose Dedicated to the Sage Koundinya II
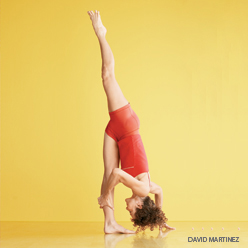
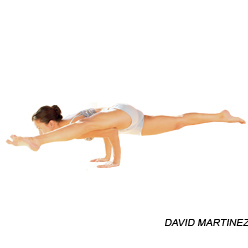
Eka Pada Koundiyanasana II

Step by Step

Start in Adho Mukha Svanasana, hands shoulder width apart. Step your left foot far forward, past the outside of your left arm, and place it on the floor well in front of your left hand.

Bend your left elbow and twist your torso to the right, dropping the left shoulder and the whole left side of the torso as low as possible on your inner left thigh. Pressing your thigh toward your torso, slide your left upper arm and shoulder as far as you can underneath the back of the left thigh just above the knee. Place the back of your thigh as high up as possible on the upper arm.

Keeping your weight centered approximately between your hands, start to creep your left foot forward along the floor so more and more of the weight of the leg comes onto the arm; let the left foot naturally move a little to the left as you do this. When you can’t walk the foot any farther forward without lifting it off the floor, straighten the knee as much as you can, powerfully reaching the foot forward and out to the left side.

Bending both elbows, shift your weight far forward between your hands until you can lift your back leg. Lift strongly until that leg is parallel to the floor; then, keeping the knee extended, press straight back through the ball of your foot.

Lift your chest until your torso is parallel to the floor, pressing strongly down through your inner hands to help maintain this position.

Lift your head and look forward, keeping your eyes and forehead soft. Breathe evenly. Hold the pose for 20 seconds or longer, then step back into Adho Mukha Svanasana. Repeat it on the other side for the same length of time.

No Comments Pose for the week

Poses

High Lunge, Variation

Step by Step

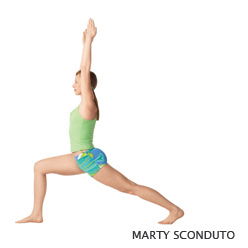
Start in Adho Mukha Svanasana (Downward-Facing Dog). Exhale and step your right foot forward between your hands, aligning your knee over the heel. Keep your left leg strong and firm.

Inhale and raise your torso to upright. At the same time, sweep your arms wide to the sides and raise them overhead, palms facing.

Be careful not to overarch the lower back. Lengthen your tailbone toward the floor and reach back through your left heel. This will bring the shoulder blades deeper into the back and help support your chest. Look up toward your thumbs.

Be sure not to press the front ribs forward. Draw them down and into the torso. Lift the arms from the lower back ribs, reaching through your little fingers. Hold for 30 seconds to a minute.

Then exhale, release the torso to the right thigh, sweep your hands back onto the floor, and, with another exhale, step your right foot back and return to Down Dog. Hold for a few breaths and repeat with the left foot forward for the same length of time.

No Comments Pose for the week

Poses

Upward Plank Pose
Purvottanasana

Step by Step

Sit in Dandasana (Staff Pose) with your hands several inches behind your hips and your fingers pointing forward. Bend your knees and place your feet on the floor, big toes turned inward, heels at least a foot away from your buttocks.

Exhale, press your inner feet and hands down against the floor, and lift your hips until you come into a reverse tabletop position, torso and thighs approximately parallel to the floor, shins and arms approximately perpendicular.

Without losing the height of your hips, straighten your legs one at a time. Lift your hips still higher without hardening your buttocks. Press your shoulder blades against your back torso to support the lift of your chest.

Without compressing the back of your neck, slowly drop your head back.

Hold for 30 seconds, then sit back down in Dandasana with an exhale.

No Comments Pose for the week

Yoga Poses

Half Lord of the Fishes Pose
Ardha Matsyendrasana

(ARE-dah MOT-see-en-DRAHS-anna)
ardha = half
Matsyendra = king of the fish (matsya = fish
indra = ruler), a legendary teacher of yoga

Step by Step

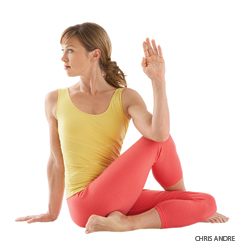
Sit on the floor with your legs straight out in front of you, buttocks supported on a folded blanket. Bend your knees, put your feet on the floor, then slide your left foot under your right leg to the outside of your right hip. Lay the outside of the left leg on the floor. Step the right foot over the left leg and stand it on the floor outside your left hip. The right knee will point directly up at the ceiling.

Exhale and twist toward the inside of the right thigh. Press the right hand against the floor just behind your right buttock, and set your left upper arm on the outside of your right thigh near the knee. Pull your front torso and inner right thigh snugly together.

Press the inner right foot very actively into the floor, release the right groin, and lengthen the front torso. Lean the upper torso back slightly, against the shoulder blades, and continue to lengthen the tailbone into the floor.

You can turn your head in one of two directions: Continue the twist of the torso by turning it to the right; or counter the twist of the torso by turning it left and looking over the left shoulder at the right foot.

With every inhalation lift a little more through the sternum, pushing the fingers against the floor to help. Twist a little more with every exhalation. Be sure to distribute the twist evenly throughout the entire length of the spine; don’t concentrate it in the lower back. Stay for 30 seconds to 1 minute, then release with an exhalation, return to the starting position, and repeat to the left for the same length of time.

No Comments Pose for the week

Yoga Poses

Supported Headstand
Salamba Sirsasana

(sah-LOM-bah shear-SHAHS-anna)
salamba = with support (sa = with
alamba = support)
sirsa = head

Step by Step

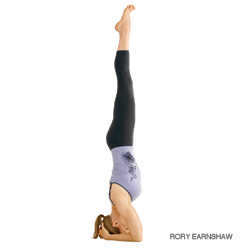
Use a folded blanket or sticky mat to pad your head and forearms. Kneel on the floor. Lace your fingers together and set the forearms on the floor, elbows at shoulder width. Roll the upper arms slightly outward, but press the inner wrists firmly into the floor. Set the crown of your head on the floor. If you are just beginning to practice this pose, press the bases of your palms together and snuggle the back of your head against the clasped hands. More experienced students can open their hands and place the back of the head into the open palms.

Inhale and lift your knees off the floor. Carefully walk your feet closer to your elbows, heels elevated. Actively lift through the top thighs, forming an inverted “V.” Firm the shoulder blades against your back and lift them toward the tailbone so the front torso stays as long as possible. This should help prevent the weight of the shoulders collapsing onto your neck and head.

Exhale and lift your feet away from the floor. Take both feet up at the same time, even if it means bending your knees and hopping lightly off the floor. As the legs (or thighs, if your knees are bent) rise to perpendicular to the floor, firm the tailbone against the back of the pelvis. Turn the upper thighs in slightly, and actively press the heels toward the ceiling (straightening the knees if you bent them to come up). The center of the arches should align over the center of the pelvis, which in turn should align over the crown of the head.

Firm the outer arms inward, and soften the fingers. Continue to press the shoulder blades against the back, widen them, and draw them toward the tailbone. Keep the weight evenly balanced on the two forearms. It’s also essential that your tailbone continues to lift upward toward the heels. Once the backs of the legs are fully lengthened through the heels, maintain that length and press up through the balls of the big toes so the inner legs are slightly longer than the outer.

As a beginning practitioner stay for 10 seconds. Gradually add 5 to 10 seconds onto your stay every day or so until you can comfortably hold the pose for 3 minutes. Then continue for 3 minutes each day for a week or two, until you feel relatively comfortable in the pose. Again gradually add 5 to 10 seconds onto your stay every day or so until you can comfortably hold the pose for 5 minutes. Come down with an exhalation, without losing the lift of the shoulder blades, with both feet touching the floor at the same time.

No Comments Pose for the week

Pose for the week

Eight-Angle Pose
Astavakrasana
(ahsh-tah-vah-krahs-anna)

asta = eight
vakra = bent, curved

Step by Step

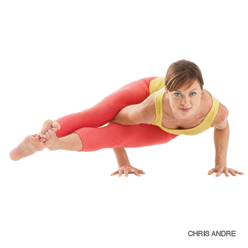
Stand in Tadasana (Mountain Pose), with your feet separated a bit wider than usual. Exhale, bend forward to Uttanasana (Standing Forward Bend), press your hands to the floor outside your feet. Then with your knees slightly bent, slip your right arm to the inside and then behind your right leg, and finally press the hand on the floor just outside your right foot. Work your right arm across the back of the right knee, until the knee is high up on the back of your right shoulder.

Brace your shoulder against the knee and slide your left foot to the right. Cross the left ankle in front of the right and hook the ankles. Lean slightly to the left, taking more weight on your left arm, and begin to lift your feet a few inches off the floor.

With the right leg supported on the shoulder, exhale and bend your elbows. Lean your torso forward and lower it toward parallel to the floor; at the same time, straighten your knees and extend your legs out to the right, parallel to the floor (and perpendicular to your torso). Squeeze your upper right arm between your thighs. Use that pressure to help twist your torso to the left. Keep your elbows in close to the torso. Look at the floor.

Hold for 30 seconds to a minute. Then straighten your arms slowly, lift your torso back to upright, bend your knees, unhook your ankles, and return your feet to the floor. Stand back and rest in Uttanasana for a few breaths. Then repeat the pose for the same length of time to the left.

No Comments Pose for the week

Pose of the week

High Lunge, Variation

Step by Step

Start in Adho Mukha Svanasana (Downward-Facing Dog). Exhale and step your right foot forward between your hands, aligning your knee over the heel. Keep your left leg strong and firm.

Inhale and raise your torso to upright. At the same time, sweep your arms wide to the sides and raise them overhead, palms facing.

Be careful not to overarch the lower back. Lengthen your tailbone toward the floor and reach back through your left heel. This will bring the shoulder blades deeper into the back and help support your chest. Look up toward your thumbs.

Be sure not to press the front ribs forward. Draw them down and into the torso. Lift the arms from the lower back ribs, reaching through your little fingers. Hold for 30 seconds to a minute.

Then exhale, release the torso to the right thigh, sweep your hands back onto the floor, and, with another exhale, step your right foot back and return to Down Dog. Hold for a few breaths and repeat with the left foot forward for the same length of time.

No Comments Pose for the week

Pose for the week

Big Mind Meditation
Dhyana

Step by Step

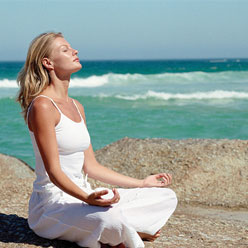
If you already have a regular meditation routine, do a minute or two of it to get grounded and comfortable, and maintain your usual posture. If you’re new to meditation, find a comfortable upright position (sitting in a chair is sufficient), take a few deep breaths, and relax as much as you can. Set aside 25 minutes for the entire practice.

From your relaxed meditation position, ask yourself to speak with your Controller. (You’ll probably feel a bit strange speaking to yourself this way, but you’re simply giving voice to the running dialogue that already exists inside your head.) The Controller is essentially your ego. Its job, as its name implies, is to control. You’ve likely met and probably struggle with this aspect of yourself.

Ask the Controller about its job, then probe further and ask what it controls—your actions, your thoughts, other people? This is neither good nor bad; the Controller is just doing its job. A key component of the Big Mind process is gaining the Controller’s—the ego’s—cooperation and not threatening it with annihilation, as spiritual training often does.

Once you gain the Controller’s trust, you can ask it for permission to speak with your other voices; the ego is usually glad to temporarily step aside if it has been consulted.

Next up is the Skeptic. Before asking the Controller to speak with the Skeptic, however, take a deep breath; when you shift into another voice, it’s good to give the mental movement a physical correlation.

Let the Skeptic be what it is. It’s OK that a part of you is skeptical; it’s actually a good thing. If you didn’t have a skeptical voice, you might find yourself continually being hoodwinked. Ask the Skeptic what it has doubts about.

Now take a breath and ask to speak with Seeking Mind. Shift over to this new voice. Meditators often have a problem with Seeking Mind; they want to get rid of it, because it creates so much desire. But Seeking Mind is doing what it’s meant to do. It’s helpful to remember that without it, you might not be meditating in the first place.

Take another breath and shift to Nonseeking Mind. Nonseeking Mind is the state of meditation. There is nowhere to go, nothing to do. Again, this is neither good nor bad; Nonseeking Mind simply doesn’t seek. Explore Nonseeking Mind.

Take a moment here to notice how easy or hard it is to shift from one voice to another. Moving among your different selves helps you realize the empty nature of the self—that is, you have no static identity; you are continually changing. You might think your identity is set in stone (I am shy, I am angry, I am spiritual), but these are just voices floating in space; they’re not you. You’re much bigger than you think.

Now take a breath and shift into Big Mind. This is the voice that contains all the other voices. It is known by various names: the ground of being, Buddha Mind, Universal Mind, God. By its very nature, it has no beginning and no end. There is nothing outside of Big Mind, but Big Mind is a voice inside of you. Big Mind’s job, you could say, is just to be.

Ask Big Mind what it does and doesn’t contain. Does it contain your birth? Your parents’ birth? Your death? Can you find its beginning or end? Does it contain your other voices? How does it see your daily problems?

Stay in Big Mind for as long as you can. In this state, you have surrendered your personal ego (with its permission) to your true and universal nature.

Next, find your voice of Big Heart. Explore what it does for you and others. Its job is to be compassionate. How does it respond when someone or something is hurting? Does it take the form of tough love or tender nurturing or both? Does it have any limits when faced with suffering? Sit with this voice for a while.

Now shift back into Nonseeking Mind and stay with it for a couple minutes to end the meditation. Though you might want to stay in Big Mind forever, the simple fact is that no single voice is the stopping place; there is no stopping place. Continually working with and accepting all of your voices will, in turn, help you accept the myriad voices of others.

Once learned, the Big Mind process can be used at any time during meditation practice or throughout the day. If you’re feeling particularly angry during meditation, you can connect with Angry Self, let it have its say, and move into Nonseeking Mind or Big Mind. Play with your various voices and see what you can find.
No Comments Pose for the week

Pose for the week

Marichi’s Pose
Marichyasana III
Seane_in_Marachi_Pose_st

(mar-ee-chee-AHS-anna)
Marichi = literally means a ray of light (of the sun or moon). Marichi is the son of Brahma and chief of the Maruts (“shining ones”), the war-like storm gods. He’s one of the seven (sometimes 10 or 12) seers (rishis) or lords of creation (prajapatis), who intuitively “see” and declare the divine law of the universe (dharma). Marichi is the great-grandfather of Manu (“man, thinking, intelligent”), the Vedic Adam and the “father” of humanity.

Step by Step

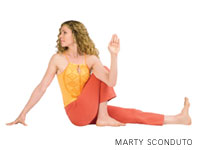
Sit in Dandanasa (Staff Pose), then bend your right knee and put the foot on the floor, with the heel as close to the right sitting bone as possible. Keep the left leg strong and rotated slightly inward; ground the head of the thigh bone into the floor. Press the back of the left heel and the base of the big toe away from the pelvis. Also press the inner right foot actively into the floor, but soften the inner right groin to receive the pubis as you twist. Grounding the straight-leg thigh and bent-knee foot will help you lengthen your spine, which is always the first prerequisite of a successful twist.

With an exhalation, rotate your torso to the right and wrap your left arm around the right thigh. Hold the outer thigh with your left hand, then pull the thigh up as you release the right hip toward the floor. Press your right fingertips onto the floor just behind your pelvis to lift the torso slightly up and forward.

Remember to keep your straight leg and bent-knee foot grounded. Sink the inner right groin deeper into the pelvis, then lengthen your front belly up out of the groin along the inner right thigh. Continue lengthening the spine with each inhalation, and twist a little more with each exhalation. Hug the thigh to your belly, then lean back against your shoulder blades into an upper-back backbend. Gently turn your head to the right to complete the twist in your cervical spine.

Stay in the pose for 30 seconds to 1 minute. Then release with an exhalation, reverse the legs and twist to the left for an equal length of time.

No Comments Pose for the week

Pose for the week

Standing Split
Urdhva Prasarita Eka Padasana

Step by Step

Perform Virabhadrasana II (Warrior II Pose), right leg forward. Inhale and cartwheel your left arm up and over your head, creating a nice opening in the left ribs.

With an exhale, twist your torso to the right, pivoting on the ball of the left foot to lift the heel off the floor. Then lean forward, lay your front torso onto the right thigh, and set your hands on the floor on either side of the right foot (if your hands don’t rest comfortably on the floor, support each one on a block).

Walk your hands slightly ahead of, and shift your weight onto, the right foot. Then, inhale and slowly straighten your right leg, simultaneously lifting the left leg parallel to the floor.

The proper balance of external and internal rotation in each leg is important, especially for the standing leg. Your left leg and hip will tend to externally rotate slightly, lifting the hip away from the floor and angling the pelvis to the right. Try to keep the front pelvis parallel to the floor by internally rotating the left thigh.

Pay close attention to the standing leg, especially the angle of the knee. The knee will tend to rotate inwardly: Be sure to rotate the thigh outwardly and turn the knee so the kneecap faces straight ahead.

Feel how the downward energy of the standing leg creates an upward movement in the raised leg. Don’t focus on how high your raised leg goes; instead, work toward directing equal energy into both legs. You can hold the raised leg more or less parallel to the floor, or try to raise it slightly higher; ideally your torso should descend as the leg ascends. If you’re flexible you can grasp the back of the standing-leg ankle with the opposite-side hand.

Stay for 30 seconds to 1 minute. Then, lower the raised leg with an exhale and repeat on the other side for the same length of time.

No Comments Pose for the week